
|
BPH 106H SM106 Restoration 2015 |

|
|
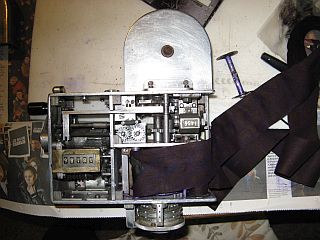
Christmas and the New Year are not a good time for bus preservation in my calendar, so it was a good opportunity to put some music on and perform a minor operation that has been hanging around for a long time - putting the new ribbon into my Green Line Setright ticket register. It's not particularly difficult if you have the instructions to hand, and it was done soon enough, and without much inking of hands. Except that I remembered while attmpting to issue a ticket that I also needed to replace the rubber pad in the head of the printing ram, which meant removing and then re-fitting the ribbon. "So it goes........", as Kurt would say. Funny that I am writing this close to the anniversary of the Dresden fire-storm which was the genesis of "Slaughterhouse Five".
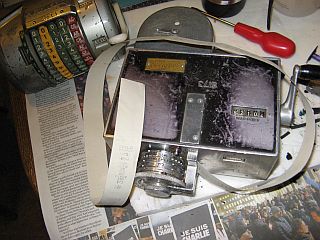
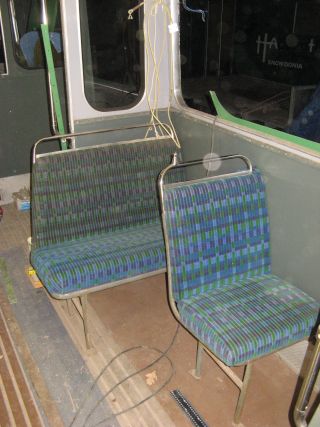
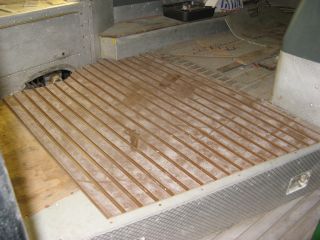
After all that I decided I was having so much fun that I did the Almex as well. Both ribbons were bought online a good while back, but the real driver of progress was receiving in the post a London Country cliché plate for my Almex rgister, which having originated with Green Line and ended up with Speedlink Air Services printed Green Line, which is fair enough, but quite wrong for a 418 to Bookham. My grateful thanks to the donor, who was one of those folk in the right place at the right time (which I never am) to tender for a huge pile of redundant ticket registers which were subsequently anonymised and sold to 'collectors'. This register was obtained by my good friend Eddie Knorn, and donated in lieu of cash for setting-up a web site for his St.Albans Collection of LCBS vehicles. While testing the Setright, I found that it still printed 6s and 9s in the shillings track - due, I suppose to the conversion from its previous non-decimal conversion having been incomplete. I think that the 's' was simply ground away manually. The pence ring still carries half-penny graduations, but only to 9½ so it is a funny bodge, especially as the shillings ring is limited to 11 out of the 19 available. Meanwhile, back at the bus, I was having a look at the stores and checking the seat-frames and cushions. The two single seat-backs that I have are in shocking condition, suggesting that a great deal of their subsequent service life was on the original mocquette. I decided to have an experiment to cut another full-with part down to the narrow width, which was surprisingly successful but I didn't dare to cut the fabric to size on the spot! With the weather holding any serious work at bay, I thought that it was about time that I put some of the very expensive Multislat flooring to use. It's quite tough to cut with a Stanley knife, so I had sore hands at the end of the day, and the profile I was seeking was rather complex. The end result was a joy, however.
Once the big piece was finished, it became obvious that the smaller piece at the front, which cuts in around the demister-blower housing, could be furnished from a small offcut that I inherited with the bus, and that would keep the second sheet intact (and saleable). As before, it was a real fiddle to cut against the blower housing and the angled front of the cab floor upstand, but was a success. There is a colour mismatch, but it's worse in the pictures than real life, and will soon fade with a bit of footfall. Then the nosing had to be cut with an awkward angle at each end (and still fit snugly) as well as a slight chamfer on the leading edge of the Multislat, whose raised stripes were a bit thicker than the white rubber. All in all I was very pleased with the result and look forward to getting the glue out in due course to stick it all down.
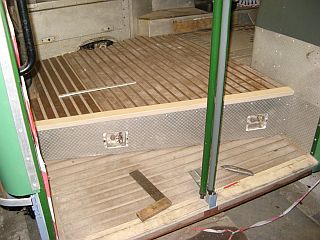
Then it was back to the exit step-well and the realisation that my step tread was too narrow to reach out and overlap the wooden filler that sits against the threshold angle. If the front edge of the step tread does not protrude far enough, the integral nosing of the Treadmaster will be supported only imperfectly and will not last long, so there was no real alternative to cutting a new piece of plywood. Fortunately there was plenty left over, and I do have a template to draw around to speed the process along. Once it was complete, it was also evident that I have a long enough remnant of the plywood to make a new top for the bench-seat footstool, which has suffered from too many variations of metal nosing being applied and ripped off again. While I was investigating the butchery to which it has been subjected over the years, I discovered a tightly rolled leader from a Setright ticket roll printed with BLUE LAKE COACHES - more transport archaeology! Finally, new holes were drilled for the door-support poles and associated fixing bolts and we were ready for more permanent fixings when the weather warms up.
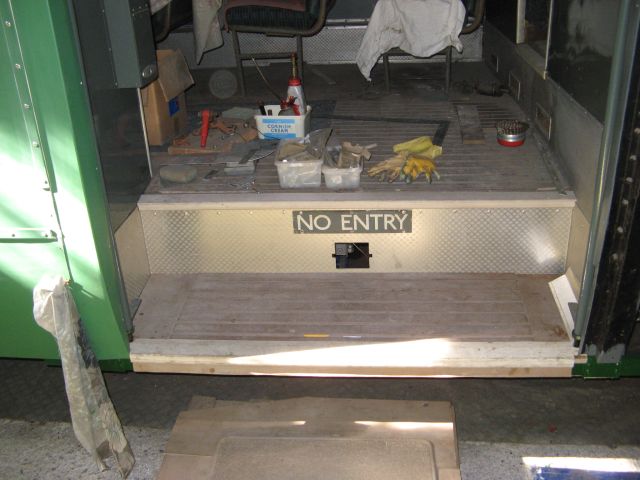
One of the main reasons why I have made no attempt sofar to re-install the entrance doors was the amount of room that would be lost for the tricky job of cutting the entrance bay Multislat lino to size. Now that the cutting, if not the fixing, has been done there seems to be no reason to hold back any longer, apart from the delicate matter of cleaning them up and putting some appropriate paint on them. The first step was to remove the split and sordid relic that was the rubber nose on the leading edge, then the internal grab handle and the little plates where the passenger handrail attaches. The cream-coloured paint was terrible, and flaking in places, not to mention the extent of over-painting of the glazing mount. As a lot of the paint seemed to be loose, I tried gently to remove it with the blade of a wide woodworking chisel which won't dig in as a narrow one would. Eventually I discovered that real progress could be hade by drawing the EDGE of the chisel along the narrow vertical sections. So long as plenty of pressure was applied, the paint just flew off in all directions and after about half an hour the door was back to rubbed-down NBC Leaf Green condition, and just needing attention with wet-and-dry paper before new undercoat. Ah! Just realised that the grey side will also need doing. Drat! But hold on one moment - exactly how do two, superimposed sets of emergency opening info appear from under the cream paint? Answers on a postcard, please. There has been progress, but nothing dramatic, and on warm days (not too many) there has even been a paint-brush in evidence. On one special day five different paint finishes were applied to at least four different parts. Two of the parts that have been painted were the exit door-support poles, which had been in green undercoat but ended up in grey gloss. Another was the box with the NO ENTRY legend from the rearmost lower saloon window, together with the inside of its flap which should be reflective white, but was beginning to show rust, which is not good. The glass with the legend has long been removed so that it can be renewed. You can tell that I am looking forward to the day when the windows are replaced in that zone! The exit threshold has been painted in green gloss; it's one of those details that is easily overlooked, but it projects outside the area of the step-well below the lower body panelling. Research (the PRV website with picture of brand-new SM119) into the correct fitting of the white nosing on the Multislat lino of the exit step indicates that it simply sits between the two corner returns, so some measuring, marking out and cutting with hacksaw and Stanley knife took place with due caution and nervousness to enable an initial fitting without folding everything up and wrecking it. The piece that I inherited was not in good shape, being cracked in two places. Further long periods of contemplation as to the proper fit of the corner returns finally established a way forward, so it became possible and critical to fit the exit step tread in place. Now, like most jobs on this vehicle there are a series of layered procedures that have to be completed in order, otherwise impossibilites arise - such as passing the door-pole spigots through the step after it is fixed down, gluing the Multislat down after the step and spigots are fixed, or placing their fixing bolts after the plywood is fixed in place. I decided that I would use round-headed scews from underneath this time, instead of countersinking screws from above (as prototype on the front step). Eventually the parts were all trimmed to size, painted as necessary and ready for the Big-Bang, after which the forward corner return was loosely in place, the Multislat stuck down and the door support poles installed. My secret for positioning the Multislat once it has been glued takes advantage of the fact that it is a contact adhesive. Lay a clean cotton sheet over the floor once the glue is touch-dry, leaving a narrow strip in a strategic position for lining up the job. Then the lino can be positioned carefully without sticking except for the narrow strip when you have it in the right place, then pull out the sheet carefully and press the lino down behind it. Hey Presto!
It looked lovely, and opened the route to completing the panelling between the doors. A great deal of fettling, drilling and cursing ensued, but a morning's determined work saw all the panelling rivetted in place with just two short lengths of moulding to apply. I also didn't do the plain strip that runs beneath the yellow livery panel (it is purely cosmetic and can be applied at any time) as I was running out of Seamseal mastic, which is a shame since that would have meant a total rivet count of over 100, but even 81 were enough for one day and still a personal record. For some reason I was having trouble with my lazy-tongs rivet tool, which began to refuse to grip the rivet stem, which was strange because it would subsequently work just fine. A word of warning: do whatever is necessary to complete the setting of the rivet, because one that is even only one-quarter set is virtually impossible to remove without doing damage to the panelling. As for the short lengths, I confess that one was unpainted and the other painted green by mistake, so that can be sorted soon enough. I was very pleased to be able to recycle a damaged length of bona-fide PRV moulding, so in the end only one short piece of new material was necessary, and at the moment it doesn't show - but undoubtedly in green gloss and daylight it will stick out like a sore thumb! So it goes...........
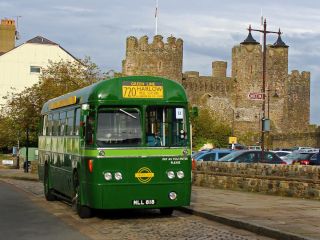
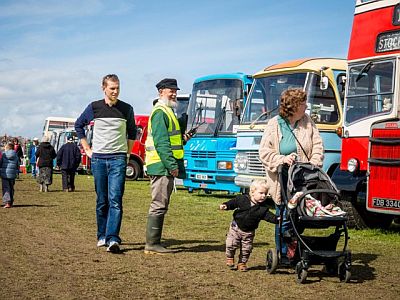
The Llandudno Transport Festival was compromised by wet weather at the last moment. After most of the exhibits were in place on Friday or early Saturday morning, continuous drizzle and more or less light rain through Saturday and a downpour on Saturday night and the early hours of Sunday meant that the site was locked down and no road-runs were possible, despite fine weather on Sunday and especially on Monday when it was too late. It was a real shame as it also meant that the organisers' own vehicle did not make the prominent debut that everybody was hoping for after 23 years of work from a wreck with its engine in pieces to a really smart machine. I was also impressed by the impeccable turnout of a long-distance visitor, MLL 818 or RF281 which had come up from Harlow in Essex. We don't see enough LT vehicles, in my view - but there is of course an elephant on the showground in the shape of my own bus! The shuttle bus service was fairly busy on Sunday, but the shortage of punters meant that the total journey count was down to 210 - still a remarkable total and a credit to the vehicles, drivers and officials.
With the panelling virtually complete between the doors, it should not be long before windows become an important issue. As received, SM106 was fitted with two windows bearing NO ENTRY boxes in the slider, which was clearly wrong! Fortunately, Steve F had sourced some spares, and I collected a couple from DMS junk at Eddie Knorn's orchard. The recent fettling and painting of the NO ENTRY box on the good pane has already been described, but of course the replacement glass needs a new legend. The original, with crazed printing (2013B), was carefully photocopied on my scanner, then taken to a local vehicle signs specialist who had previously done the registration mark glass for the rear of Len's VOD. He reckons that the original was probably a waterslide transfer, which has just shrunk, but the dimensions can still be determined, and the font. Even while I waited, his CAD system set it up in Gill Sans (so close to the original that nobody would ever know) and he had gone most of the way to a new vinyl to stick on the glass. That meant that I had to scurry home from work and clean the remains of Numark's logo off the spare glass - which turned out to be surprisingly easy with nothing more than water, JIF and some elbow grease. We await the application to the glass with great interest. |


|
BACK .......to the index. |
FORWARD .......to continue the diary. |