
|
BPH 106H SM106 Restoration 2015 |

|
|
Got to keep the loonies on the path........
However, after sporadic and short visits to SM106 to check that all is well, serious tasks are underway again. The short visits were fine for little jobs such as fettling and attaching lengths of moulding to the inter-doors areas and making a start on finishing the livery detail there and at the rear on the offside. The fence at the rear of the garage has finally rotted away and collapsed, but I did not expect to find three sheep that had wandered in through the rear personnel door when I went investigate an unexpected noise. Fortunately they all exited the same way when confronted, and only left a couple of droppings to mark the occasion.
All the mouldings are now attached between the doors, and the brush strip has been attached to the exit corner return that marks the end of the ‘completed’ territory. I want to re-instate the glazing between the doors as a matter of priority, so work towards finishing the green gloss is proceeding, with a very satisfactory undercoat being applied to a large proportion of the area. One conundrum is how to finish the bare rivet-heads that are inserted through undercoated mouldings. Up ‘til now it hasn’t been much of an issue, since most have been done with screws and the paint should adhere well, but with five adjacent mouldings with bare aluminium rivets there is a decision to be made. Accordingly, most were abraded with fine carborundum paper during the de-nibbing exercise and then wiped with a dab of etch primer on a scrap of sponge (best painting utensil for narrow workpieces) to limit the application and prevent the solvent from fetching the alkyd undercoat off. The remainder were left un-primed as a control. The elephant in the garage, however, is still rampaging around and trumpeting loudly. Why, you ask, has the locking strip never been inserted in the weatherstrip around the front windscreen? Well, I reply, here’s a question for you: why does the nearside windscreen not fit? The answer is simple enough, though the implications are serious and the explanation unfathomable. First, a lesson in how the windscreen fits a London Swift (disclaimer: other body types unexplored). The outer, GRP pan is contoured to look pretty, but presents a flange which meets the edge of the many separate parts of the interior trim, except at the base on the dash which is a piece of folded 1.5mm aluminium strip that makes a light but very strong angle that is riveted down onto the top of the dash. The weatherstrip simply sits over the paired thickness of GRP and metal sheet and holds the glazing in place - the majority of the weight being transferred to the dash. The windscreen is in two pieces that are each straight and butted at the centre so they make a shallow vee-shape when seen in plan view. They are curved in the vertical plane, but that is irrelevant to this story. The intersection of the curved dash and straight support angle is accommodated by the clever GRP moulding. The reason for the misfit is obvious if you do something that no sane bus restorer would do, unless they had long experience (which I don’t) - check that the straight upstand on the dash is, errr, straight. Which it wasn’t, and it should be, and the upshot was that the nearside corner of the glazing ended up nearly ½ inch outside the ‘envelope’ and will not engage the groove of the weatherstrip.
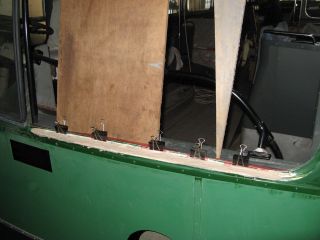
It was with great sadness that I was forced to cut the new rubber so that I could remove said windscreen safely, which is way more valuable than off-the shelf weatherstrip, and set about rectifying the problem. First the rivets holding down the upstand were removed, and the angle simply heaved carefully back at the centre so it became straight rather than convex and opening a gap behind the lip of the GRP pan. The gap can just about be visualised in the image, with arrow pointing at the widest area. The source of the problem is that the front dash is more curved than it should be, and solving that problem would mean dismantling all the work that has been completed on the front of the bus, which is a horrendous prospect, and could not be completed in time for what may prove to be an enforced move from the present location. I suspect that major trauma has been inflicted on the front corner of the bus, and the repairs were not perfect. Indeed, it is very obvious that the aluminium cladding of the dash in the entrance has been replaced as it does not carry PRV pink primer. How the old windscreen fitted is still a mystery, but I suspect that the weatherstrip was much softer and more compliant than the modern counterpart I have sourced. Anyway, the action plan was to cut the GRP moulding with an angle-grinder and patch it up in-situ but aligned correctly with the straight upstand. Not a nice job, but much simpler than the alternative. Since a tenant was installed in the adjacent house, I have lost access to electricity, which is a significant drawback, but if any power tool is required it is critical! Luckily, I was able to call upon the assistance of the neighbours on the other side, who kindly allowed me to plug my extension cable in through a window for the few minutes that it took to perform the cut, which went as planned but created more dust in the area than I was happy about. Then it was a case of patching the GRP, but it was far from ideal considering that I was trying to mend the pan from the outside, which meant that I couldn't use the old profile as a 'mould' in the usual way, and neither did I want to end up with the GRP glued irrevocably down with the resin. In the past I have been very successful in using polypropylene 'worktop savers' as formers since the resin won't stick. For this job I cut strips that inserted upright or horizontally to ensure that any excess of resin would not adhere to the dash or upstand. A slight difficulty at this point was that the upstand could not be rivetted down in its new fixing holes until all the polypropylene strips were removed, so some extra stabilisation was necessary in the form of some random boards. Then the entire void at the back of the GRP pan was stuffed with glass mat and liberally coated with resin. Fortunately the thin strip of the pan was sufficiently flexible that I was able to pull it about and ensure that plenty of resin ended up on its rear. Then the desired profile was created by securing the pan agains the dash upstand with bulldog clips, and after it was set filler was applied to the gap and roughly profiled. A subsequent session saw much more attention to the filling and smoothing before it was declared fit and painted in green undercoat. Since which time we have endured nothing but wet weather and floods, though fortunately the recently redesigned flood-banks seem to have done the trick and kept the local rivers at bay - though the Conwy Valley has looked more like an inlet of the sea for a good while. Either way, progress on both the bus and the new garage ground to a halt. |



|
BACK .......to the index. |
FORWARD .......to continue the diary. |