
|
BPH 106H SM106 Restoration 2016A |

|
|
You will not be surprised to hear that it has been raining over the Winter, and things have not gone well in the Conwy Valley, but at least the river has stayed out of the village and the old garage, though the new garage site sported a very fine swimming pool which wasn't part of the plan. Sadly, the architect has been much slower on the submission of plans for building regulations approval than he had promised. The work on stabilising the boundary has restarted with improving weather and ground conditions, and the gabions are surmounted by a fine fence. Wind has also featured, and the rear doors of the old garage blew out into a heap of more or less rotted boards. Fortunately, repairs were made promptly, but the general state of wet arising from rain coming in where it should not has made it a frustrating and inhospitable place. In fact, so much rain has been falling on the forward end of the bus roof that I found a puddle in the luggage pen, and was forced to mount a window in the front bay to keep any splashes out. This did not fit with the general timetable, which would see the apertures painted in livery first. So, in the face of adversity, I have retreated with some loose parts and some tins of paint to my house or garage, which can just about be made habitable for work on paint etc.
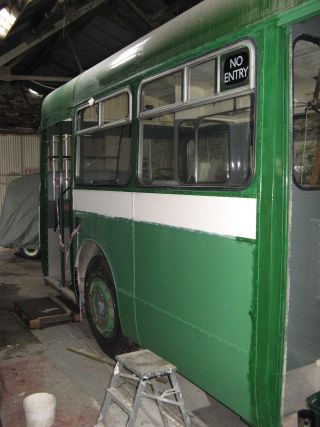
First up was the restoration of the renovated NO ENTRY glass to the illuminated box on the window adjacent to the central exit doors. The new legend was applied to the NUMARK glass that was recovered as a spare, and it has graced the dresser in our front room for many a month. Rubber weatherstrip to suit was a bit of guesswork, but it turns out that the same profile as that used for the driver's cab window is just fine. I tried the smaller profile from COH Baines as an experiment, but it just did not grip the glass. I was rather nervous because the old rubber had set like rock, and the corners were small in radius but the new rubber was sufficiently pliable that it went together very nicely. The subsequent application of the locking strip was a little more tricky, but patience and care won the day. Tip: if you are doing this with the window installed, you WILL need an accomplice inside the bus to push from behind, but I was able to reach into the box with my spare hand. I think it was an interesting lesson for the extant problem of fitting the nest-box (air-inlet) covers on the front of the dome. A start was also made on the refurbishment of the nearside indicator unit, which needs the lamp base fettling with new fixing screws so that it can be reinstated. A good set of reflectors has been found by rummaging around all the spare units with which I am furnished - and thanks again to my Fairy Godmother for the necessary orange lens which I needed to complete the set.
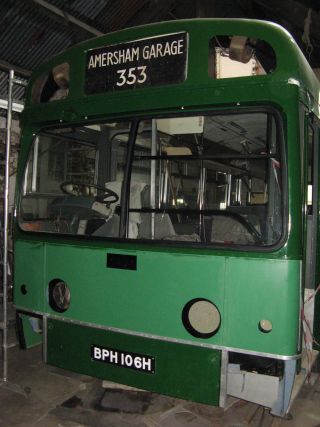
Although the forward window was doing a good job of keeping the rain at bay, there was no real imperative to mount the rear one, except that I hate having good bits of kit lying idly on the garage floor. So that was also put in place, and very nice it looked too, while making the lower saloon almost cosy again. Meanwhile, back at home, the foremost leaves of the entrance doors were taking colour on both sides. Because of the narrow frames, they were a bit of a faff to paint, and large quantities of masking tape accumulated on the garage floor. Using the fan-heater out there succeeded in raising the temperature above the critical point, so the paint became workable and there was no condensation. Unfortunately, it has proved to be impossible to source a replacement for the badly-split nosing rubbers, and the pattern which Baines sell which is nominally compatible proved on arrival to be too narrow and not thick enough for proper engagement in the slot at the back of the door-frame to be even slightly secure. I shall have to check all the itmes in stock to find the least awful examples to re-fit. Having the door leaves hanging around was too provocative to bear, so I spent a very frustrating and uncomfortable morning wrestling with the floppy and reluctant (and at risk of damaging the new paintwork) pair attempting to re-attach them to the support poles. It was not happy experience, but I think I learned enough that the the repeat match with the rear pair of leaves (four in all on an SM, of course, unlike a later DMS). Again, another step towards a bus as opposed to a green shed. The new weatherstrip for the reinstatement of the windscreen has also arrived (7 metres of IRS1195 by COH Baines), so a useful morning was spent preparing the green gloss around the aperture for the day when the first paint of Spring can be applied.
In the end, not only did the windscreen pan get its coat of paint, but so too did the window apertures in the lower saloon It was just one of those jobs that needed doing, and with the weather turning warmer and drier it was the obvious way forward. As the job was undertaken on the spur of the moment, I found that I had not packed any of my decent paint-brushes, so I was forced to hunt around in my box of decorating goodies, and found a cheap (Ł1-10p) 2" brush with soft, synthetic bristles which I had picked up in Stermat (our local independent DIY and homewares store). Well, the finish it gave has to be seen to believe - fantastic! Once the paint was hard it was time to fit the glass, and it was a struggle again. Not only are the screens heavy and large, but once again I was trying to fit the nearside half into an experimental aperure. Although the bottom on the dash was now straight, the glass was too tall, but only at the upper nearside corner. Then I remembered that I had re-made the interior head panel to overcome the ghastly hole made for the "BUS STOPPING" sign, and had obviously erred on the side of caution. A bit of work with my trusty curved Surform (a fantastic tool, if you don't own one yourself) soon made the necessary space and the glass pressed home. Fitting the offside glass was complicated by the centre strip, but as ever it was just a case of working away steadily and not trying to force anything. The curve on the upper part of the screen makes the fit very awkward, but I am becoming more skilled at this job, unfortunately, given the number of times it has been in and out again! The locking strip, when I had recovered was not a simple insertion, which was a surprise since it is the same size as for the side windows, and I expected the larger rubber section to spread more easily. Once again, patient pressure prevailed eventually, and that was the job done and ready for a bit of polishing. A job that has taken about 3 years! |


|
BACK .......to the index. |
FORWARD .......to continue the diary. |