
|
BPH 106H SM106 Restoration 2013 |

|
|
It has proved to be a long and arduous Summer, and with many commitments have kept me busy in the evenings when I normally keep this account up to date. There have also been holidays, birthday celebrations at Bletchley Park, weeks away in Manchester house-sitting while double-glazing was installed, gardening and geology meetings. So, although 106 has been progressing, the story has not. Thank you to everybody who has expressed concern on this matter. We are both well, if not also actually 'alive', so let's pick up the story again........
The big story has to be the successful bending-up of the exit step-well. It was a substantial chunk of metal, rather longer than the "Ship" and a good deal longer than the supplemental angle that forms its clamp, so a hybrid approach was taken by using the "Ship" as a heavy base and the pair of hard-wood boards that were used way-back for bending the nearside-front door-pillar panel. G-clamps completed the ensemble (as well as my standing on the loose angle from the Ship) and the the job was commenced by bending the lip which holds the step-tread. The sequence of bends was critical, otherwise the job would have come to a rapid halt trying to hold flat a part with a new bend in it. The 1.8mm thick sheet bent surprisingly easily, but I soon realised, in the wrong place! I had forgotten that I had made the shaped sheet the maximum size possible, rather than the necessary 10 inches plus the lip. Unbending was not an option, so I then had to cut it down to the correct size by taking a slice off the upper straight edge. This meant that I would end up with side-lips that tapered, but it isn't actually important as they are under the tread and the exit threshold will take all the strain anyway. You will see what I mean in the pictures. The fiddly complication is that the step tread is not flat, but slopes to shed the wet.
Once that was done I felt that the job was under control, so the lip was bent on the wing parts and then the wings bent up to make the sides of the step-well. Then the correct curved profile to the out-board ends of the wings had to be cut. When it was offered up to the bus it fitted surprisingly well once a bit of fettling to avoid cable-runs and the like were completed. It just shows that a bit of thought, effort and luck can coincide to do a job. It was a shame that it had to be removed immediately because the exit rear bulkhead needed painting and the reluctant door pole was still firmly resisting attempts at removal. In the end it was persuaded to move by holding the top-spigot arm with a spanner and hitting the adjacent pole-arm with a hammer, then working it backwards and forwards for an hour while standing on the lower door arm. You can be sure that I had removed the bulkhead glazing first! A milestone was passed, however, and now the cut-out for the courtesy light has been made and the back painted properly so that it might not corrode so badly in future. One unwelcome piece of news that came to light once the rear leaves of the exit doors were removed, is that inherited efforts at removing rivets holding the draught-seal brushes and pipework trunking had resulted in a drill-bit penetrating the bundle of air pipes that supply the door-ram. That is not something that can be left undone, so it was off to see Truck-Parts North Wales to obtain a supply of 5/16 inch air pipe and replacement olives. Fortunately, obtaining the parts was easy (though not cheap) so part of a morning was spent replacing all of one pipe run from the manifold above the door down to the supply tee behind the exit step. Great joy attended the discovery that the second damaged pipe was only the exhaust air that is piped below floor level, so it did not also need replacing (it was only nicked slightly, anyway) as it never carries pressure. The bulkhead was smoothed over with wet-and-dry carborundum paper as usual, then primed, undercoated and top-coated twice, so it looks rather pretty now.
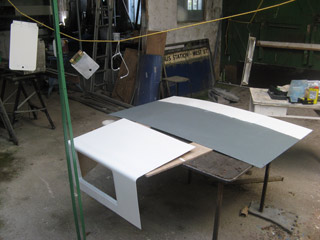
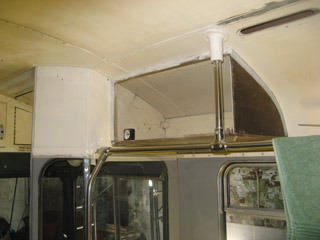
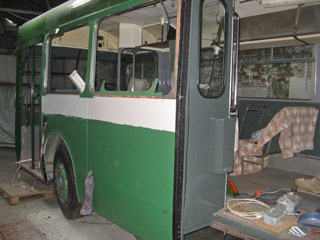
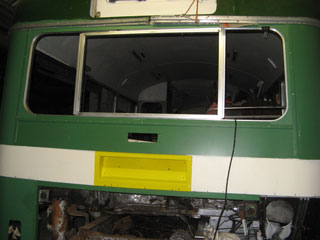
Another matter that has been dragging on too long is the reinstatement of the handrail stanchion at the rear of the bench seat, which was made to length and left because the ceiling needs preparation before the upper socket is installed. So, a determined effort at rubbing down and preparing the ceiling in this area was commenced. The RM835 Group did some damage in this area, chipping lots of paint off the mouldings (or was it loose already?) and making some hard work necessary. Fortunately the area involved was not too large, but a patch of the main ceiling above the gangway was prepared as well for a technology experiment. A light coat of etch primer was followed with two of magnolia undercoat and then two of top-coat, so you can guess that it was not a quick job when rubbing back was included. While the roller was out the livery-band of the Bay 2 panel was also undercoated in an appropriate colour. Until this one, I had always forgotten that the top of the panel was not always green! You can also see various small parts hanging on the line to dry, and two full lengths of moulding in green undercoat. The garage extension is good for painting, as the roof is translucent, but the area is unusable when the wind is blowing in Autumn because of the seeds being shed by the overhanging Birch trees, which flutter about like micro-confetti and settle in the paint.
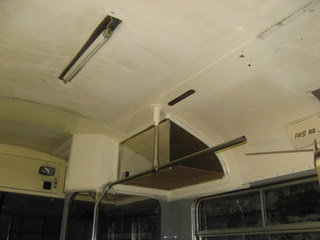
Fortunately, when it came to magnolia top-coat time, it was a flat calm, and a pleasant day. I could not resist opening the tin of Canary Yellow, which is also applied over the magnolia undercoat. The colour does not render well in flash, but you will get the idea. You can see the difference on the ceiling between the damaged and abraded mouldings which I have inherited, and the properly-finished ones. There are no short-cuts here, because paint will not adhere to poorly-prepared work, nor without an etch primer (which tends to fetch off any other finish still remaining). Some while back I made and sleeved some new straps for the air tanks, but one ran into a problem when the PVC sleeve clamped itself onto the metalwork because I had not applied enough lubricant. Nor would it come off again! After losing the part when I brought it home for attention, and finding it again, I asked my neighbour Ian to apply some pressure with his air-line to the free end of the sleeve so that it could be slid off again. Luckily, as the sleeve inflated it did let go of the rod, but also ejected it with some force! It was the work of just a couple of minutes to lubricate it and slide the sleeve all the way over, just as originally intended and successful with the other three straps. I have just noticed, in the picture below that the stripe of experimental paint across the width of the ceiling is reflecting absolutely perfectly the curious mud-yellow that some deranged operator applied to the front blind-box. Spoils the real effect!
With the first top-coat drying reluctantly, and a poor forecast for the next weekend, I asked if I could take half a day's leave on the following Monday, so the final coat was applied very promptly, in the warm, and with very good effect. It's amazing how the colour deepens with subsequent coats of gloss. The following weekend, with all the paint dry, and rain pattering down on the roof, the driver's locker was re-assembled in place with its door re-hung and the lock mechanism oiled and polished. The rear air-tank was slung under the chassis, and the handrail stanchion taken home for drilling. Drilling the stainless tube was proving just as hard (literally) as I feared, so the drill-press and a new set of cobalt drills will be applied in due course. The undercoated panel for Bay 2 was hung in place, and the whole place given a bit of a tidy.
In the third week of October came news that we had been awaiting for some while - we are grandparents. Now there is a serious reason to get this bus working; the entertainment of the next generation of bus enthusiast! Plus, "Bws-Taid" (Welsh for Grandad's Bus) must not become a music-hall joke. Anyway, with distractions like that floating around it was good to find some peace (if not calm) at the garage. In fact, with rain hammering down on the roof threatening to drown the sound of my portable radio, the amount of water falling from the gutter INSIDE the garage was horrendous - so first job was to pull on my wellies and climb onto the roof and remove the thick mat of leaves and seed debris from the local Birch trees which had blocked the down-spout. Then with a gurgle the water was gone, and some sort of order obtained. Mopping-up took a while - but it is good for the floor to get a wash, otherwise the dust is terrible. The first job undertaken was the replacement of the screws in the casing of the driver's locker - all 35 of them. Buying round-headed brass screws is not so easy in the retail park these days, but eBay provided a ready source that was despatched within an hour of ordering. No wonder the place is going bust slowly. Then a bit of metalwork. SM106 has obviously had a nearside impact at some point, and the exit threshold (being built from angle-section) has deformed as it was bent. Although straightened at some point, a significant bump was still present where the damage had localised by the cut-out for the door-support lower bearing. The metalwork is too light for a straight hammer-attack, so a hydrid approach was made by backing up the metal with a lump of heavy steel and pushing on the underside with the bottle-jack. It's simply amazing how easy it it is to lift one side of the bus by a few centimetres. Then a few smart blows with a 2.5lb hammer (not metricated yet) were sufficient to smooth out the bump. A quick whizz with the wire cup-brush and a dash of primer were the end of that phase of the restoration of the exit step, whose wooden tread will now sit easily and flush on the threshold. Thinking about air-tanks has raised the spectre of the rear brake-chambers. Years ago, one was disassembled, cleaned-up and left on one side due to doubts about the seal where the push-rod pokes out of the casing. Replacement type 24 chambers are easily obtained, but they are mostly specified for trailer brakes and have a fully-threaded push-rod. I think that a threaded push-rod would be wrong since it makes a sliding fit into a socket which allows the handbrake to be applied without moving the diaphragm. WARNING: if you have spring-brake chambers do not attempt this procedure without expert advice in case of releasing the springs which provide the brake-force, with potentially lethal effect). Bear in mind that a service brake application will exert a force approaching one ton on the push-rod. The brake chambers on this chassis are air-pressure actuated, so only contain a light-duty spring to return the push-rod and diaphragm to their rest position.
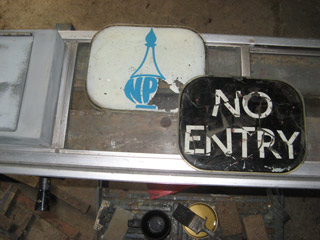
So, the other chamber (untouched until now) was opened by sawing through the clamping bolts, and it proved to be a far from pretty sight. Apart from general corrosion and thick cobwebs, the seal assembly which prevents road-dirt from entering through the push-rod hole was pushed right down with its spring and seized on the rod, which rather unexpectedly was beautifully chromium-plated over its operating length in the chamber, which made quite a contrast with the rusty push-rod disc. It never ceases to amaze me how optimistic spiders can be in making thick webs inside places like brake chambers - surely passing flies are pretty rare? It was soon freed and cleaned-up a bit, then taken to our friends at Truck Parts North Wales (this is becoming a habit!) to see if a replacement push-rod or other parts can be obtained. Thereafter, it was a case of fiddling at fitting painted parts while listening to a particularly fine sequence of Johnnie Walker's Sounds of the Seventies - Supertramp's Logical Song, Oye Como Va (Santana), Couldn't Get it Right (Climax Blues Band), Chanson d'Amour (The Manhattan Transfer) and Heart of Glass (Blondie). I thought I'd be there all night! Couldn't Get it Right was particularly interesting because I have not heard it since 1976 when it was played at a student disco in the Merrion Suite in Leeds city centre. I didn't know it at all, and I would have liked to hear it more, but I didn't know what or whom. Salutory thought that SM106 was still nominally earning a crust for LCBS when the record made the top 10 in October 1976, although actually in overhaul at Tinsley Green. With the anticipated arrival of cold, damp and GMT came a new determination to do something more progressive than decorative on my next work-day. With the exit threshold fettled, it seemed logical to proceed with the installation of the exit step-well. Suffice to say that it went fairly smoothly, with only one fixing hole drilled out of line, and not particularly far, either. Because of the difficult access from behind, which is obstructed by the chassis member and supports for the heater pipes it proved necessary to make a drilling-jig from the old part - which is substantially corroded and messed-about, hence the out-of-line hole - so that the fixing holes could be made from the front. All awkward and time-consuming work. It was also decided to use pop-rivets throughout as a temporary fix, although solid rivets are available it is a two-handed job to insert them in this confined area. Plywood was then cut and shaped for the tread and fettled to fit between the door-pillar ribs, so it is now possible to climb aboard in the unapproved manner again. At least it was possible to keep warm with all the sawing and planing! Thereafter, extra holes were drilled in the riser to fix the "NO ENTRY" sign, which was hung in place loosely. Cutting a white rubber nosing for the edge of the saloon floor made a cosmetically complete job, although repairs to the Treadmaster flooring will be required to replace material that Blue Lake cut away to install crocodile-teeth nosing. Darkness fell early, so that was enough for a day.
Meanwhile, on the other side of the forest, the search (as A.A. Milne would say) was being organdised for a replacement push-rod assembly for the brake chamber was progressing. To cut a short story rather shorter, a new one was made from scratch and delivered rather smartly, as it turned out, instead of a quotation as was requested. This caused a bit of upset, but a reasonable price was agreed and I am ready to consider re-assembly of the "Chamber of Horrors". With luck the new springs, diaphragms and glands from the new chambers could be used to re-furb the old ones, which will should paint nicely when cleaned-up properly off the job. And then there is the small matter of the stainless steel stanchion lying on the floor in our front room awaiting drilling. Maybe a day working at home is indicated...... As usual, it's getting set-up to do a job that is the worst part. In the end, balancing the stanchion and stopping it from moving on the table of the drill-press proved to be the only tricky part of the drilling operation. Once the first hole was made, rivetting the junction casting into place made it possible to jig-drill the remaining holes. Then repeat for the lower junction casting. The magic formula was 900 rpm, plenty of intermittent pressure and lots of coolant. I used the same water-soluble cutting oil that I use on my diamond saw for slicing rocks, and a brand-new set of BOSCH branded HSS-G bits. The eight holes and rivets took about an hour, and the surprise was that it was possible to jig-drill the 3/16" holes without a pilot-hole, which was much faster than repeatedly changing drill bits (even with a keyless chuck). Torque, pressure and patience: winning formula! Next day, the completed item was installed on the bus, and it looked just fine. The rail which forms the "armrest" of the bench seat also required re-fixing, so the fixing holes in the wall were drilled out and re-plugged, then a rubber gasket was cut to slip under the wall-plate to give a bit of resilience to the assembly. The modesty panel was then rivetted back in place. A dash of Autosol and some elbow grease finished the job properly and a cup of tea was taken to celebrate another milestone. Then it was back to the brakes. I wasn't keen to crawl underneath, but I am glad that I did because I found that the air-pipe unions fitted the new chambers perfectly. I had forgotten that I specified imperial sized air-fittings, and when I realised that the fixing studs were 5/8" UNC I realised that swapping push rods into the new chambers was the way forward. The only fly in the ointment is that my pipe unions differ between the original chambers, but finding two pukka items and some pipe is a much better game than soda-blasting and painting. Another happy day!
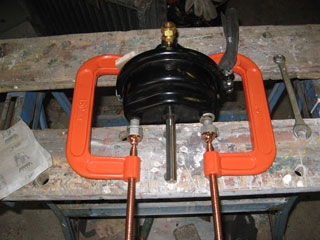
The way forward is never straight, however. Although I had a complete set of parts, I could not clamp the two parts of the brake-chambers together! No clamps that I had would open wide enough, and the workmate just wasn't up to the job - so I had to go and buy some larger G-clamps. Even then, it wasn't plain-sailing because it turned out that the assemblies were difficult to hold in alignment while tightening them, so a hybrid approach whereby the assemblies were held in the workmate for alignment, then squeezed tight and the clamping rings installed. The bolts were not long enough to accommodate the set of cone-washers that Maurice had made for me, so I shall need to find longer ones and install them in due course, but at least the chambers are complete and ready for further action.
Deteriorating weather in December brought its own problems, and visits to the garage roof to clear drifts of sodden leaves from the gutter, or mopping-up the wet floor
have been frequent diversions. The wet floor has deterred me from spending any time underneath the bus, but I have to report that both air reservoirs are now back underneath
where they belong, though the problematic issue of reconnecting the pipe runs has not yet been tackled. I am in any case very cross because I have misplaced the set of
wedge-shaped blocks that fit the (angled) retaining-straps to the (straight) chassis mountings, because without them the rear reservoir cannot be secured properly. They are
a far from simple job to replicate, being at all angles (of necessity) rather than neat and rectangular. All the other parts of the original straps are to hand.
So it goes.....................
The last event of 2013 must be recorded, even though it was not a restoration task - a first visit to 106 by my new grandson. He was obviously quite happy, and slept peacefully throughout our improvised picnic, well insulated by the yellow hat his grandmother had knitted for him. When we had finished our sandwiches the Christmas tree was erected on its hook under the front destination blind and that was that for another year. |


|
BACK .......to the index. |
FORWARD .......to continue the diary. |