
|
BPH 106H SM106 Restoration 2014 |

|
|
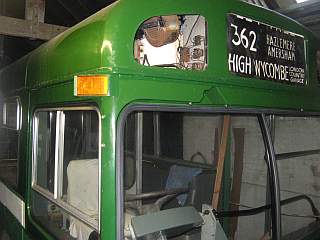
The weather has been rather wet, but we have not fared badly. Whether it is a matter of improved flood defences, or sheer luck I don't know, but the Conwy Valley has not seen flooding of any magnitude this Winter - instead it is the coast that has taken a pasting, and our promenade in Deganwy has vanished for around 50m where there was a historical problem of overtopping and a general lack of substantial foundations. The railway line was was washed away north of Llanrwst, leading to the stranding of a class 150 unit which was on a 'Stiniog service. Closer to home, there was minor flooding of the luggage pen on SM106 due to glass in the garage skylight blowing out onto the roof and the subsequent heavy rain entering where no windows are currently installed in the lower saloon. At least the garage roof is still intact, which is a blessing! Other great news is the granting of planning permission in January for the new garage, which will be an exciting diversion.
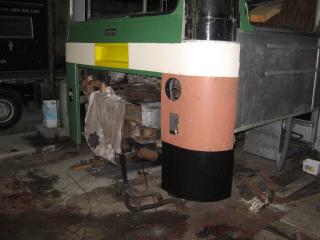
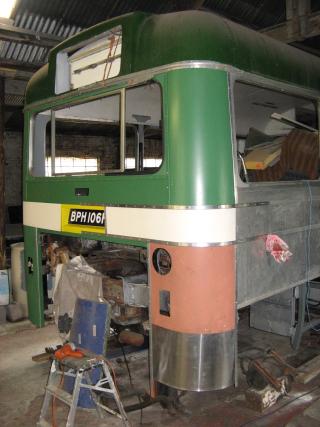
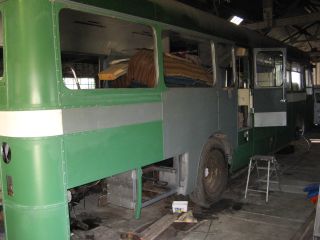
Among the earliest activities of the year was the fettling and re-attachment of the offside front indicator ear. This has been knocking about for a long time awaiting fitting, but in cold weather when other tasks are too traumatic it seemed a good idea to press on. No great difficulty was encountered, but ultimately some attention to wiring will be needed, and a coat of green paint on the clamping strip that grips the lenses. This led on to appraisal of the other castings that are in stock. The original nearside unit from SM106 is badly corroded. The alloy castings of that era are not very good - but they have survived for well over twice their expected service life, and my predecessors have done a good job in finding spares. To this end, I took the item which I assume (from the colour) was sourced from SM533, to clean up and paint for eventual installation, This was the first encounter of what became a theme over the Winter: the snapping off of screws under strain during undoing attempts. After a whole afternoon spent in trying to undo the remains of sheared clamping screws, I learned something. Great care to avoid damage to the casting is required, of course. Two screws 2BA pass through the clamping strip, which is an intricate aluminium extrusion. What is not obvious is that they are of reduced diameter apart from the threaded end, so when the casting corrodes they cannot be forced out past the tenacious deposit built up in the clearance section of the fixing hole. Drilling in with the finest drill bit you own will break up the oxide AND if you are lucky, convert the screw into a primitive tap which will cut a new thread on its way out. The small screws holding the lamp-holder in place also failed, so there is plenty to work at before it can be hung on the bus again. Fortunately I have a number of spare parts sourced by the previous owners and Maurice cannibalising MB541 a decade ago. At some point the doors must be re-instated, and for that the lower bearings must be in place. That needed holes in the wooden step tread, so it was out with the hole-saw once again, and some tricky geometry since the poles are vertical and the step is not horizontal! Anyway, it made for an interesting morning's work, and now we are ready to think what to do about the corroded, seized-up stubs. One of the most serious, festering sores on SM106 was the condition of the offside rear corner, which had become damaged during the recovery from Northchapel (the irony of the use of that facility by the London Bus Museum aka Cobham is not lost on me). In short, the lower panel has suffered in the way that is all too common and been irreparably damaged by dragging down a ramp too steep for the back-end to clear. Ian assured me that their Routemaster was also in danger of grounding the platform in the same way, so LBM had better beware! Anyway, off came the damaged panel, which being the lowermost, entailed the removal of all the corner panels. Fortunately, none of the time-consuming stuff involving the lipped moulding had been done, so it wasn't difficult. Fortunately, I had a piece of sheet in stock and just about the correct size. One joy of the premises that I inhabit is the collection of bric-a-brac lurking in corners, so it was fortunate that a half-empty propane cylinder was exactly the right diameter to wrap the basic bend into the flat sheet. The second curve to match the tumblehome of the body side was less pleasant, but amounted to the careful application of brute force and a bit of wrapping the panel diagonally around the gas cylinder. After that it was a matter of sitting back and thinking about how to finish the job of ovelapping with the body side above the radiator flap, finding the rivet holes and fixing the whole thing together with some mouldings. Now, it has exercised me greatly which way the overlap happens (does the corner panelling sit on or under the side panels?).Given that the rib at the rear of the radiator flap has NO ovelap with anything, the moulding must face forward and that sets a precedent for the remainder of the joint. The other problem is that some cuts and marks have been made by my predecessors that are confusing at best, or plain wrong at worst. Getting a fresh supply of suitable moulding was another problem. In the end I had to use a precious, non-professional Friday to drive to Oldham and pick up a load of four lengths (must have cost almost as much for petrol as metal), making a call at Carlyle (not very productive) and sundry relatives for various reasons.
Back at the bus, with a pile of supplies at the ready, it was time to start drilling and countersinking in earnest. Using a piece of original moulding as a template meant that it was possible to pick up an original set of holes in the rearmost side-pillar, and slowly the job was built up from the back of the side window. Once the general scheme had been fixed by reference to archive photos of SMS369 at Cobham and SM114 at Ongar it was possible to crack on and do the main horizontal runs that traverse the rear elevation above and below the number plate. It also proved necessary to make a new angled cover for the offside engine hatch bearer and a rear trim for the offside window, which had holes in all the wrong places after an abortive attempt to fix the upper quarter panel a while ago. I also made a decision that will upset the purists. I heve broken the run of moulding at the centerline of the rear elevation, for the simple reason that if it proves necessary to strip one corner, it can be done in isolation and put back together neatly. It is also pragmatic because I am not yet ready to finish the nearside corner, but I will be able to proceed with paint and glazing on the offside alone. The gas cylinder was called into play again to roll the moulding smoothly, because with holes drilled when flat, any bending tends to take on a thruppeny-bit profile due to the weakness of the metal at the screw-holes.
Weather remaining stubbornly cold, domestic decorating and the inevitable intrusion of the Llandudno Transport Festival have combined to delay the opening of the painting season, but early in May I was at long last able to rub down, prime and undercoat all the loose parts for the offside corner and obtain all the extra screws to hold it all together. It's shocking how difficult it is to buy simple stuff like brass csk screws at an affordable price. Digging around on eBay I also found an antique-pattern brass doorknob set for our house, so that was a useful spin-off! Another irritation has been the poor finish that I obtained when painting the exit rear bulkhead, so that has been rubbed-down ready for a new gloss coat on a suitable day. On a quiet evening I manufactured another number plate for the rear, so now she is marked at both ends.
In the end it was a few weeks before the kit of painted parts could be re-assembled, and I had overlooked the necessity of painting the rear-most bay of the offside before the curved parts could be assembled over it! Rubbing down and priming was done first, with a diversion to the exit bulkhead while the primer was drying. Then it was a matter of green undercoat - and this time I remembered that the yellow stripe area should not receive it. A couple of sessions were then spent in reassembly of the corner, installing the glazing in the exit bulkhead and advancing the offside by rubbing down and priming the area as far forward as the emergency door, which has been finished for a very long time now. The number of screws and rivets involved was not to be sneezed at, and it was quite slow going, but very satisfying to be able to throw away at last an empty box that once held 200 stainless steel raised csk screws. It's quite a milestone to know that paint now stretches over largely complete panelling from the exit right round to the nearside rear corner. |


|
BACK .......to the index. |
FORWARD .......to continue the diary. |