
|
BPH 106H SM106 Restoration 2012 |

|
|
I was disappointed to miss the Manchester-based London Bus Day organised by David Thrower and friends, but it was on the middle weekend of our annual holiday, this time on the Rhins of Galloway (look it up). The real surprise on our return was an email from Justin Vella on Malta, who is interested in AEC Swifts. I responded as promptly as I could but have received no further communication, so I hope it's just one of those glitches that happen online, and not some sort of change of heart in Malta. If you are reading this, Justin, please try again to contact me. The difficulties of earlier in this year have not abated, and now we are in the holiday season at work the pressure is greater than ever, but at least the weather has improved so that it is possible to think sometimes about waving a paint-brush in anger. The local objective for a while has been to put the windscreen back in place, which requires a full paint job on the windscreen pan, including the gutter moulding which has been in place since last year. A number of short sessions have therefore been spent mostly on preparation in those areas, undercoating the gutter and cab window pan, cleaning and painting the windscreen support angle on the front dash and finally cleaning, rubbing-down and gloss-painting the whole of the front roof dome, cab window pan and all the parts of the windscreen pan that had not yet been finalised. Fiddly bits included making a metal shim and rubber gasket to fit under the foot of the central window bar and painting bits of trim while the brush was in action. One day I managed three colours! Attaching bits that were removed for treatment has also been important, so the front air reservoir is now back (loosely) in place and the rear destination blind box has been finished with all the trim in place and a complete decorative treatment, including the flap which has even been painted white inside for better illumination. Basically the bus was looking the part for the annual Directors' Inspection when Eddie Knorn and Richard Buckley ( The Yelloway Project) came for their fix of Conwy Valley hospitality in early September.
Optimism with regard to the glazing proved to be short-lived. I am so embarassed that I have become a revisionist and removed my previous, enthusiastic comments. In short, fitting the windscreen proved impossible. The weatherstrip that I had chosen looked good and fitted both the glass and the rebate well, but the width of the web (the bit the glass stands on) was simply too great, and of course any error is doubled because the weatherstrip fits on both edges of the glass. This was a bitter blow, and after a day of fruitless effort I was exhausted. Even fitting the weatherstrip into the aperture is hard work by the time it has been squeezed-up to make sure that it does not creep back and leave a gap. And the glass is heavy (even half a windscreen is a metre square). The following week I tried again with a half-decent length of the old weatherstrip, which is mostly so dried-out and cracked that it fell to pieces when the windscreen was removed by Steve Fennell & Co. The length at the top is in deep shade, and so much better preserved. It fitted fine, because the web is much slimmer. I shall order in a fresh length from COH Baines and try again, since it still appears in their catalogue, but what relation it bears to the pukka product I have no idea. Similar failure attended my renewed attempts at fitting the air intake covers on the dome. Basically the weatherstrip does not grip tightly enough to prevent the assembly falling inwards when any pressure is applied to fit the locking filler, and it is not possible to reach round with a spare hand to push simultaneously on the other side. "Dag nab-it!", as Deputy Dawg was wont to say. If anyone has any advice, or a source of tried and trusted weatherstrip to put 3mm glass (or GRP) into a 2 - 2.5mm GRP panel I would be delighted to hear from you.
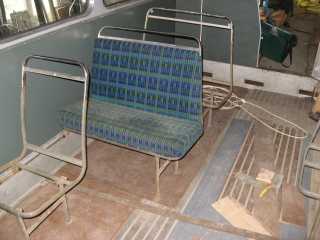
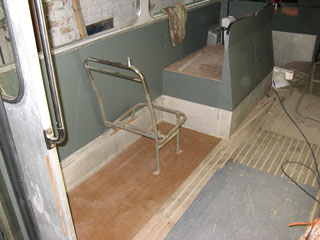
To console myself, and to try and stay positive I have had a go at some easier problems: laid new lino on the nearside of the lower saloon, bolted a couple of seats in place for a laugh, played with the trim and top moulding of the luggage pen, and more importantly, thinned-down the nearside, front wheel-arch panels and given the moulding a trial fitting. Getting some more glass in place seems a good idea, and there are only two bays between the doors. Which means that I have to make up a new sliding-light unit with a speaker panel for the front bay. If you look carefully at photos of SM106 towards the end of her service life, you will see that the front window on the nearside carried a "NO ENTRY" box in the sliding-lights unit, which was wrong in so many ways. All the necessary bits were knocking around in my stock, which has several spare lights and a (red) speaker panel. It could not be so easy, now could it? First it was all filthy, and then it was the old problem of shearing screws in attempting to disassemble a half decent unit to repopulate. Why does one end undo perfectly, and not the other? I soon learned that there are four variants of sliding-light, and I seemed to have more or less one of each - which was good because I finished the day with a top unit bearing a speaker panel and sliding-light, which was what I needed. Intriguingly, the light had a pair of disused holes where the stop-block should fit for this application, so it must have fitted this position in the past. Stranger than fiction. Other news, on the new garage front, is bleak, but I won't say anything here in case it is prejudicial. I do not visit the ex London Transport empire more than once per year, and that is always on business now that my Hitchin outstation (aka The Willows) has closed. There has been a strong correlation between the annual conferences of PESGB and Swift activity just because of proximity - so this year I organised a round-robin by car instead of Super-Voyager, a misnomer if there ever was one, and made a number of calls thanks to the hospitality of Dick Turpin, who has been at the forefront of obtaining new stocks of Multislat flooring for a number of vehicles. Thus, in late November we went to visit his SMS678 which is the extraordinary survivor that everybody had forgotten. It was a rather soggy day after heavy overnight rain, which is never a good time, but the vehicle is in remarkable shape after its long standing and very interesting to someone who has only seen PRV bodied examples since the mid-seventies! It was also good to catch up with Paul Brophy after several years, and then to meet Keith Wright who has generously passed-on what appears to be a genuine luggage-pen handrail.
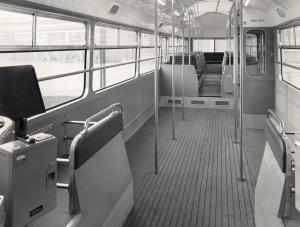
Connoisseurs of the MCW bodywork of the London (and Country) Merlins will recognise major elements of the PRV luggage pen on SM106. If you look carefully at the offside coin acceptors of the Country MBS as shown in the online photo archive of the London Transport Museum you will see what the PRV Swift would have looked like if automatic fare collection had been pursued as intended. There are even the pair of bars to close off the end of the luggage space, just as found on my SM, but not yet fitted. The SMS was a different beast, with a huge grey cabinet carrying a turnstile and the Country MCW body was totally different in its execution, with a bench seat at the nearside front. If you took away the forward end panel of SM106's luggage pen and stood a Setright machine in the space you would have recreated the Country MBS. Keith and I have discussed the origin of that handrail which came off MBA545. Blue Lake rigged up a modified version which stretched right across the offside AFC unit mounting and luggage pen, since there was never a machine in place during their ownership. Eventually MBA545, which was also modified with a low entrance step, was bought by Keith for the AFC cabinet to re-populate MBA444, but the handrail was not part of an MBA set-up, he says, so after adjustment to its original length it went into his attic. You can see that it looks very much at home on SM106 - with just one screw strategicaly placed for the photo. So - a successful mission which has yielded parts for further leaps forward. And in the same week I have bought 7 metres of IRS1195 weatherstrip for the windscreen, which I was able to compare with that on SMS678 while with Dick. That rubber goes back to the 1980's and is very much expected to be original, and appears to be identical. Fingers crossed. While pondering all the above, I thought to visit the Park Royal Vehicles website run by Graham Hill. This has expanded a great deal since the late Summer, and now includes a set of official images of bodies for the AEC Swift, of which there were not very many apart from the London Transport order. Thanks to Graham and his associate John Foster for a truly fantastic collection - and in particular for preserving and presenting official images of the LCBS Swifts which are not known to me from other sources. I was very pleased that Graham made available the high-resolution scanned images of the London Country Swift as a consequence of my interest, and they are quite literally a rivet-counter's delight. Information sources have moved on a notch now that we have a 3D example, parts lists and official photographs.
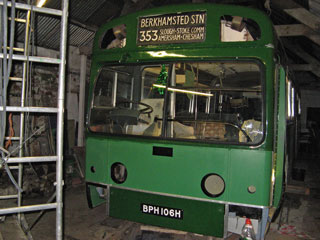
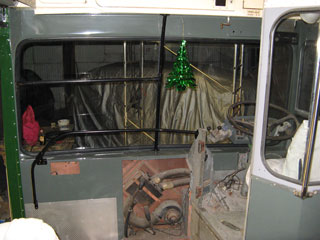
The prospect of a whole day of bus activity, and positive temperature albeit with rain, meant that something big had to be attempted. With a new length of weatherstrip for the windscreen to try, there was no competition. I still had reservations about the nearside, which has a distinct curve to the dash mounting rail, but this is an 'original' feature and a trial installation was the only way to gauge how serious it is. Briefly, the window handrails were removed so that I could insert a (forgotten previously) joining rivet in the panel under the destination blind box, and the opportunity taken to drill out and plug the screwholes in the nearside door pillar, and then refitted (and tested with a few quick pull-ups outside the bus). The new rubber was heavy, and the slight lip on the panel legs meant that it fought me all the way as I placed it into the aperture. Once in place there was no denying that it had a good grip, and I was throughly warm from the exertion. I thought it best to experiment with the original glass, just in case I damaged it, so up went the offside screen and it was soon settled into the lower edge, which meant that I could have a breather. By starting with the screen a few cms inboard I was able to push it progressively into the side pillar, but I was left with the old problem of being unable to insert the top of the screen into the groove in the rubber, at which I felt vey unhappy. However, by working from the inside (yes the glass was unsupported, but fairly secure unless pushed outwards) I was able to lift the outer leg over the top of the screen. The rubber was then not properly seated in the pan, but as it had a generous engagement this was not a problem. Then, outside the bus again and ensuring that the rubber was free all along the top of the screen, I pushed steadily on the glass and was rewarded by a gentle sinking sensation as the glass and rubber moved into their proper position. It may not have been kosher, but it worked, and was rewarded by a cup of tea. The vertical joiner between the screens was then cut and shaped at the ends so that it fitted over the main weatherstrip and pressed onto the driver's side screen. The nearside screen was almost an anticlimax because it proceeded almost exactly as the offside, although there was the added problem of fitting four sides of the glass rather than three. In the end, there was nothing I could do to stop the bottom corner gaping, so the agenda for repairing the dash panel upstand is set. In case you were wondering, those simple tasks took from about 10:30 until 16:00h. How time flies! A fine day's work, and after so many disappointments the sight of the reflections in the windscreen from the Christmas tree were a source of great, seasonal joy. As you might expect, Christmas did not present any opportunities for bus work, but New Year's Eve showed so little promise for any other activity that I was allowed out to play at last. Heavy rain had brought flooding to the Conwy Valley, and the spillway at Dolgarrog hydro-electric power station was shedding water at a phenomenal rate as I drove down, but apart from a blocked drain causing a few puddles, all was well at the garage. Under the circumstances (wet and drippy) only interior work was possible, so I set about making a (new) replacement for the front dash kick-plate, which I had messed up quite spectacularly by not allowing for the fit to the front door-pillar and de-mister fan box. It took all morning to measure-off and then drill the fixing holes before it was offered-up, fettled and fixed in place. Definitely a great improvement. An hour was then passed on fiddling with the offside indicator casting, which I had cleaned-up and painted during the Summer while the green brush was busy. They are fascinating assemblies, with hinged reflector/lens assemblies under the orange diffusers. As usual, the alloy castings have corroded and the screws are difficult to extract, but I was able to find two screws and a good central extrusion which clamps the diffusers in place. Unfortunately, I have only one complete pair of diffusers (long and short for front and rear aspect) but SteveF had managed to source several short ones with which to barter. It also turns out that 2BA screws are acceptable, and with a spare clamp extrusion from MBA541 we are proceeding fairly well towards a complete nearside unit. As darkness was falling I did not try to fit the casting, but it's ready to go. That's all for 2012, so Happy New Year to all our followers, and let's hope for good progress in the next 12 months. |



|
BACK .......to the index. |
FORWARD .......to continue the diary. |