
|
BPH 106H SM106 Restoration 2009 |

|
|
At last 2009 has come to life. The prospect of trying to work on metal with temperatures as low as minus 5C was too awful, so I have stayed away until the thaw. Everything at the garage seems fine, but rain falling onto ice in the gutter backed up and overflowed into the barrel for a bit, and the water-meter has frozen and burst. SM106 was still very cold and covered in condensation which was OK for a bit of window-cleaning, and tolerable for panel work, but not a lot else.
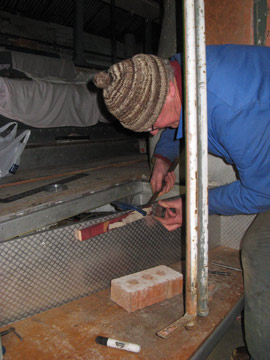
Question: How many holes must you drill in a piece of beading a yard-and-a-half long on Park Royal's standard pitch of 3½ inches? Answer: a lot; actually 18 by the time you have added the extra one by the wheel arch. A busy morning of tidying, marking, drilling and screwing was followed by a session completing a small curved section to follow the wheel-arch to the end of the first bodyside rib. The difficulty now will be finding some decent metal to drill into to fix the last piece of beading down the the rib, which has been penetrated rather often. The other problem to emerge is exactly how to finish the lower corners? Steve has found some 'rubber' parts in rather poor condition, and I also have a nicely panel-beaten aluminium part for one side. I reckon that some GRP would be a good idea, except that making a mould in right and left-hand will not be easy, though there is always the possibility of selling them to friends! After all the holes were drilled in the beading, those which required screws for fixing needed countersinking. I was very pleased to find a very good countersink cutter in my favourite hardware shop, which is Stermat in Colwyn Bay. Such a bargain at £1-79 that I bought two and the metal started to fly as I set to with my drill-press at home.
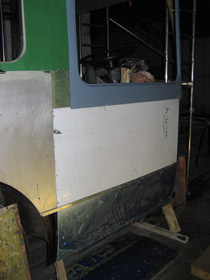
As my chosen mechanic has stayed resolutely out of touch, I decided that it was time to open a new front myself. No attempt has been made to start the engine since SM106 was recovered from Southbourne in 1996. I can be sure about that because she had no starter-motor when acquired by me, and I have not tried to do anything but turn the engine over. First job was to work out which pipe was which at the bracket over the top of the engine, then disconnect the inlet to the lift pump and stick it in the top of a gallon container (top left, above) then hand-prime, loosening joints around the system to let the air out and prove the delivery of fuel. Then, following Maintenance Bulletin 52 which is very specific, loosen the bleed-screws in the fuel pump and continue hand-priming. Fuel flowed very slowly from the bleed-screws. Meanwhile, underneath, a steady drip of fuel was emerging from the dribble-gallery at the banjo union of No.5 injector. Once that was sorted out by swapping the fancy hollow screws around to find one that tightened properly in the hole, it was time to turn the engine by hand, which is easily done with a socket attached to the nut on the alternator drive pulley. Any fuel appearing by the injectors now had to originate in the fuel-pump, I reasoned, as it would leak from the loosened union nuts on the injection pipes. Battery connected, throttle wide open, screwdriver applied to terminals and my light went out as was anticipated (the inverter shuts off when the volts drop) but the engine turned. After twenty revolutions the injector pipes were tightened and the screwdriver was applied once more and this time there were signs of life! I had to check that the stop lever was fully off (still haven't found out if there should be a spring to hold it back) before trying again, and this time the engine actualy started and ran up to speed, filling the garage with choking, blue fumes. Stop lever operated, engine stopped and a cup of tea taken. Another milestone! SM106 draws breath for the first time in over 12 years! Now I have to fill the radiator, and that will be a problem because in all the time I have owned her I have never clapped eyes upon the tap missing from the drain-cock. Easy, you say, fit the one from SMA13! Yes, I have tried and it is too big - foiled again. After all that excitement, it has been down to earth again to push along some other projects. Preparation of the rear dome for the great day when it is warm enough to paint is proceeding, with all the green goo now removed from everywhere except the offside corner, and the filler rubbed down smooth where it was applied to the gouges and cracks in the gelcoat. Some attention has also been given to the last roof bay as well, with the dent smoothed out as well as I could hope. The cove is still slightly dished when viewed with a straight-edge, but it would take pounds of filler to straighten out completely. SM106 must carry some dents with pride. More effort has been put into the entrance step area, with the curved tumblehome to the front dash being cut with a jigsaw while I had some power available, and final fitting of the kick-plate in the front entrance. I have a pair of quarter panels which have been manufactured using a pattern which has DMS009 scrawled on the back. Unfortunately, one of them is poorly curved and has a pronounced kink. It would be good if I could use the DMS model instead, but the sidelight aperture is in the wrong place so it will have to be used as a pattern again. Underneath, I have been looking at the steering problem and found a floppy relay lever, so that must be disassembled for attention. With luck it may be the cause of the slack steering that caused a hair-raising zig-zag while being towed at over 25 mph. According to the maintenance manual, the relay lever sits on top of a thick pin running in needle-roller bearings in the bracket. As it is held on by a 1.5" AF nut, I needed to find a suitable spanner. Talking to the fitter of a well-known local bus operator proved very fruitful, as he volunteered the loan of a spanner, and allowed me to look round underneath a Leyland Olympian that was over the pit in preparation for its MOT test the next week. Glad I don’t have to work on that! The bottom cover of the relay bracket retains the oil supplied from the chassis lubricator, so it was good to see clean oil running out when it was removed. Applying the spanner to the nut was the work of a moment once the split-pin was removed, and the alarming discovery was that it was not at all tight, and could be undone against the torque of the pin in the bearings. Lifting the lever off the top of the bracket revealed the sorry sight of a gnarled 'O'-ring of much smaller diameter than necessary. It looks as if the bodge-it brigade has been hard at work again. Pulling out the old bearings was an easy job with the submarine (improvised bearing-puller, these pages, passim) and the replacements were very soon sourced from Bearing Man at Llandudno Junction, who also found a suitable 'O'-ring which is a BS standard part. The big question will be if the fit is improved when it is all re-assembled? A bit more rubbing down saw the last traces of NBC green removed from the rear dome, so when the warmth returns it will just need a spoonful of filler to make the preparation for paint complete. Bodywork has also progressed, as I have now installed the n/s front quarter panel which was rolled for me by my favourite local metalworkers. Marking out the sidelight aperture gave me a shock, as it turned out that the Blue-Lake vintage panel was incorrect. Luckily I was able to get the right location by comparison with the o/s panel, and now just have a scratch to remove to remind me to take nothing on trust. Looking at the rear quarter panels led me to re-manufacture the curved trim end for the o/s rear window in 1.2mm aluminium, which now fits well and looks lovely. Such an easy job that I regret not biting the bullet and doing it myself in the first place, instead of being fobbed off by a company unwilling to source the stuff necessary to make what I ordered. Tip: buy yourself a half-decent jig-saw and an angle-grinder and almost anything is possible! Another job needing to be done was the removal of the Essex Routemaster wheels so that the rims can be cleaned-up and fitted with something usable. A morning was therefore dedicated to this rather heavy task, as they were on the inside at the rear and the Michelins had to be removed, rotated and put back inside the plain-rimmed Michelins that have been waiting their turn. The plain rims are in far from clean condition, so the bus has suddenly become much less tidy-looking. Never mind. To compensate, I spent a couple of hours taking out the half-shaft fixing studs from the nearside hub, most of them came out with their nuts when I first ventured inside. Each one had to be lock-nutted on the hub end so that the securing nut could be undone before cleaning up the threads and lock-nutting the securing end so that the assembly could be tightened in the hub and finally taking off the locked nuts. Only NINE on each side, and that is quite enough. I also managed to find a full complement of extended studs that will carry the chromed AEC dish, but they will require more fettling before that happens. The half-shaft with its painted end was then slid in and secured loosely to keep the muck out of the bearings, though it will require a gasket for final assembly and filling the differential with oil. To keep the bodywork moving, I put that spoonful of filler on the corner of the rear dome.
I have been very aware of the presence on the garage floor of the air reservoir which was removed two years ago, and has not been put back because the securing straps were shot and broke at the attempt to undo the nuts. The straps are 3/8" round steel enclosed in a PVC case, the end being threaded to accept the usual Nyloc nuts. Replacement thus requires a supply of imperial-sized rod, which I have found at last. Three lengths of bright mild steel round were delivered to work, much to the amusement of our regular TNT delivery man, who is much more used to bags and boxes of rock samples. An experimental bend or two soon saw one length fit only for the scrap bin, but the former is almost right and we will get it spot-on soon. I must get some PVC hose and a UNF die for cutting the threaded ends. Other materials now to hand are 5/8" nylon air-tubing and compression olives ready for connecting the compressor to the unloader. To a semi-automatic Swift, air is everything!
The Essex Routemaster wheels with their Firestone cross-ply tyres were delivered to ATS at Denbigh for stripping while I went and did the week’s supermarket shopping, and then on the way home the rims were dropped off for grit-blasting by ProBlast at Mochdre. Nothing like a productive round-trip! A week later they were ready for collection, which was good work, and now require painting. Maurice came up over the first weekend of March, bringing a new dolly for forming or holding the head of the aluminium rivets which secure the Checkmate plate in the step-well and luggage pen areas. While he was fettling that, I went underneath with the ‘submarine’ and a newly manufactured mandrel to pull my new bearings into the relay-lever bracket, which only took about 20 minutes. Fitting the new ‘O’-ring on top and nutting-down the relay lever demonstrated an immediate improvement in the steering performance. Since wear to the bearings and pin appeared to be minimal, it can only be concluded that the steering was compromised by the incorrect ‘O’-ring and failure to tighten the relay-lever down properly. Mike Lloyd passed on the comment that in some places a fat ‘O’-ring was used by AEC as a ‘resilient bearing’, for example at the top of the steering column on an RT. After lunch we proceeded to test the rivetting dolly in the front step-well, and found that it made a fine job, so now the pieces are in place to finish that job off and proceed into the wheel-arch in due course. Maurice removed the fuel-tank filler for attention to its pivot pin and spring-hooks (one of which is missing) and wire-brushed the neck of the filler once it was accessible. The ceremonial, if symbolic, first brush-full of paint for 2009 was applied before we packed up and went home, grateful to escape from a cold wind and very noisy hail showers.
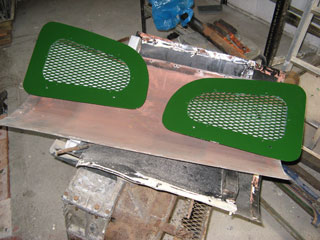
The pleasant sunshine that greeted me on my early-morning dog-walk heralded the opening of the painting season. Painting the outside of my house, now that the roofers have finished re-tiling the gables, did not count! The first task was to complete the rubbing-down of the rear dome, which was not an arduous job and almost complete anyway. Then it was a case of cleaning-up the last bit of bay 7, washing-off with a towel and sponging dry. The day was warming up nicely, so while it dried properly I went underneath with the new thermostat water-outlet adapter which has been made for me by my colleague Dennis Hunt, who runs a machining shop in Llandudno. The programme for his NC lathe can turn out another one without serious effort, so if you decide you need one, please give me a call. It looks as if rotting aluminium is an endemic problem, as both of the water outlets in my care are completely corroded away where the hose elbow fits on. Dennis reckons it was very poor quality alloy used to keep the price down, and I suppose a 40 year working life was not anticipated! Then it was up the scaffolding with a tack-rag and a coat of etch-primer before lunch while it dried: only an hour needed. After that I mixed up some green undercoat (50% neutral base u/c with 50% green gloss) and set to with the roller and brush again. For the first time this year I could feel a sweat breaking out and I was forced to remove my woolly-hat. The heady aroma of paint was fantastic, and the green was a sight for sore eyes. Finally a coat of International Pre-Kote was given to the rear dome and that was the end of a good day (apart from a second coat of masonry paint on the newly-rendered bits of my house). At last the roof has new paint from end to end, and I am now very stiff after all the leaning and stretching - serves me right! The saga of the Essex Routemaster rims has almost drawn to a close now that the rims which I have painted-up at home are at last fitted with shiny, new Michelin XZA tyres. A rubber-fetishist’s dream, they are smooth and glossy on the sidewall, incredibly deep in the tread and with a deliciously rubbery smell - what you might expect from new tyres in fact. All that remains now is to get one of the part-used spares promoted to a decent rim in place of the one with a split in the sidewall, which I should have noticed in the first place. The advance of the painting season is upon us with glorious weather at times recently, with a resultant dry and comfortable garage environment. The first task was to remove the n/s front wheel, which involved lowering it from the axle stand to undo the nuts before raising it again. The entrance step riser and kick-plate have been disassembled and their backs painted ready for final installation. Inside the wheel-arch and luggage pen, all the steel angle has been wire-brushed and primed. When a top-coat of paint has been applied, and attention to the framing is complete, reinstatement of the GRP wheel-arch will be possible. The last task of the session was to clean-up and paint in primer the replacement front door support-poles sourced from SM533. The day of the Cobham gathering dawned brightly in North Wales, and in Surrey as well, so far as I can tell from pictures of Wisley that have sprung up on the Web. It is always a wrench to miss contact with other Swift enthusiasts - yes, there are some - but progress is vital at present. A grand day was spent in cutting out the apertures for the step-well lights in the entrance step riser, painting the back and then moving on to the rear of the roof. Here a second undercoat was applied to bay 7 and the rear dome - meaning that for the first time in over 30 years, SM106 has a roof painted entirely in green! The roller was then used-up on the air intakes, so the front dome is heading for completion as well. Then it was back to the front end to paint around inside the wheel-arch and apply some countersunk screws to the framing and, paint now dried, drop the step riser in place. Suddenly it looks 'proper' with the lights in place. I still have to sort out the missing captive nuts to secure the lenses, but it can be rivetted-up and a new tread screwed-in. Finally, an undercoat was put on the entrance door poles which will soon be secured with their bottom-bracket on the threshold.
Three weeks have passed since I was last on site, due to taking a most enjoyable Easter break in Brussels at my wife's insistence. I couldn't argue as it involved a return trip from Doncaster to Kings Cross and the Eurostar from St.Pancras - both journeys were an absolute dream. I have only once travelled in a BR MK4 carriage before, and then only from Stevenage to Peterborough when they were brand-new. Pendolinos are the pits in comparison - end of discussion. I was almost disappointed by the Eurostar because it was so smooth that the impression of speed was lost, but entering the Channel Tunnel after only half an hour from St.Pancras showed that we were actually going with great vitesse on HS1. Determined to crack-on with finishing the roof, the warm but showery day started with cleaning and rubbing down all the unfinished bays. That worked up a bit of a sweat! Then it was out with the paint and (working anti-clockwise) almost unbroken activity, apart from a lunch snack after the rear dome was finished, until 15:00h and the roof gleamed all the way from the centre exit back. Finally, the bus showed a proper livery from end-to-end for the first time since 1973. What a sight. It was also a new record to apply paint to 5 bays in one session. The rest of the afternoon was spent in using up the paint in the tray on sundries such as the wheel rims, door poles, nest boxes and the panel behind the driver's cab where I am practising on the body proper. The new paint formulation is definitely superior, it works longer and runs flatter than before, so I was very happy with the result. She looks gorgeous, so well-done HMG. During all this, I was kept company by a pair of amorous swallows flying in and out and twittering incessantly. Fortunately, they showed no sign of coming further inside than the first roof-truss, as the last thing I want on my newly-painted roof is swallow **** (manure). The final act of the afternoon was to go and measure a field which is for sale with planning permission for commercial development, but is blighted by an overhead power transmission line, which is a real problem but has at least dissuaded any other buyers so far..............
Activity split over two days saw paint applied to the back of several body panels ready for a permanent installation, and procurement of a sheet of plywood to make up the new step treads and floor area at the front of the saloon. All my stock of offcuts are in 12mm or 18mm, which were the sizes used on our boat for decking and bases for bunks, and they are too thin or too thick for the bus. Plywood of 15mm thickness is less easy to find, and is specified for floorboarding - appropriately - so I was very pleased to find it stocked in 10 foot lengths, which will accommodate both entrance and exit steps within the long-axis of a sheet. A ‘normal’ 8 foot sheet is too small to cut the steps without more fiddling than the timber merchant would be happy with. So, my supplier made two swift cuts for me on his panel saw and it was ready for packing in my capacious Renault Espace. Using the existing space-fillers as patterns meant quick work to cut the two smaller pieces to size, and it was only necessary to nibble the underside of the saloon-floor piece slightly to clear the front cross-member to make a snug, flush fitting with the existing floor. The pieces were then removed again (shame) and given a coat of primer. The next weekend saw a resumption of the entrance steps campaign, drilling a lot of holes in the floor and bearers and inserting an equal number of self-tapping screws in between scuffing and priming/undercoating the front of the panels treated last time. I also dug out the Treadmaster panels that Steve Fennell had procured. Obviously they are specially made for the entrance and exit step treads, cut to shape and with white nosing attached to the ribbed sheet. A tad damaged, but a lot better than any alternative at present! If only the other job had gone as well.....trying to insert the filler strip into the weatherstrip in the destination blind box. I had trouble with the weatherstrip, which would not curve in the corners, but closed up and went wonky. The dimension is the same as the stuff that came out, but obviously it is not a suitable replacement. Please do not ring and tell me I have exceeded the nominal bend radius - that is obvious - but I would have expected a similar size of material to perform similarly. By the end of the afternoon there were no rubber, glass or blind in the box, which made her look terrible AGAIN. The painted panels look all-right, though.
Thoroughly fed-up with the rubber weatherstrip, I decided that more effort must be applied to the front entrance area. A trial length of weatherstrip for the windscreen was altogether a greater success than that in the blind box, so I am feeling happier about that critical area. The inside panel that covers the nearside front corner pillar is both folded and curved, which was an interesting challenge overcome by making a pair of bending-bars from hardwood which I clamped in my Workmate and used to great effect. The first attempt was a bit off dimensionally, but a second came out nicely after some adjustments to the bending-bars. The interior of the luggage pen also needed re-assembly because it interfaces with the front riser, and the panelling of the entrance step needed attaching to it as well. More holes drilled, then filled with countersunk pop-rivets. After a bit of paint it was ready for the re-instatement of the grp moulding - which is a two-man job as the assembly is secured by rivetting through the lower part of the luggage pen. To tidy the front dash, as much as possible was brushed-off, primed and coated with bitumen paint and a couple of new foam blocks stuck in place to stop the panel drumming. Then it was possible to hang the undercoated panels in place - and suddenly a recognisable, green bus was revealed. In celebration of this transformation, I mounted the MA front blind that was given to me by David Thrower and set an appropriate, if unprototypical destination. All we need now is assistance from Maurice - but the arrival of a new recruit (Springer Spaniel, eight weeks old) has thrown the domestic timetable into disarray. |


|
BACK .......to the index. |
FORWARD .......to continue the diary. |