
|
BPH 106H SM106 Restoration 2007 |

|
|
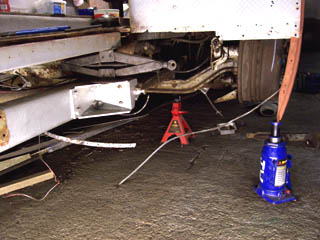
The New Year demanded a resolution, so I decided to be more pro-active and turn in some real results because a number of issues have dragged on too long and need sorting. First, I sent the corroded front entrance threshold step away to be replicated. It's not a complex or critical piece of metal and I would feel better if I didn't think that the corrosion would haunt me - even if the old one cleaned up it has a couple of holes through it where water has lain around the door pivot mounting. Second, I set about finishing the cleanup of the front dash ready for re-painting and windscreen fitting. Intriguingly, this showed that the inner panelling has been renewed at some point as it has a different paint system. I even removed the horrid little aluminium flaps to divert the de-misting air and found no sign of the old moulded plastic vents having been fitted. Maybe they never were, or is it just the replacement panelling? Third, the driver's cab window pan has been fettled with GRP repairs and the old paint sanded back to a sound base. The secret weapon for moulding the new GRP was a Lakeland worktop saver. These are flexible polypropylene and the resin will not stick to them. Successive layers displayed Blue Lake cream paint over Launceston grey over Deeble beige on top of thick Leaf Green and finally LCBS Lincoln Green. The spare MCW part has been put aside because it is in worse condition and is non-original. After all that enjoyment I felt guilty about not getting underneath and fighting the offside brake camshaft. Sounds like the Minotaur! The usual tussle yielded no result so I had a really hot cup of tea and found my bottle-jack. Attempting to lift the rear axle using a spanner certainly generated some torque, but of course the spanner moved as my makeshift cam-holder deformed and the jack slipped out. Starting again from the new angle was better, so I tried again, and of course the same thing happened. Time for the socket and tommy-bar (which is actually very difficult to use in the confined space by the rear damper) and I was shocked to find that this time I was able to move the nut without much difficulty - AT LAST I HAD PREVAILED. It took 5 months and half a can of penetrating oil, but it was worth it! Now I have to get the improvised cam-holder off the end, but I don't think it will be difficult.
* * * * * * * * FULL-TIME RESULT JUST IN: JONATHAN 2 - CAMSHAFTS 0 * * * * * * * *
Once the camshaft was out, the Battle of the Bushes commenced. I had hoped that replacing the offside brake-camshaft bushes would be a matter of routine - certainly they came out and went back in well enough. Examination of the old, inner bush showed that it was curiously mangled-looking, and neither were original AEC parts like the nearside pair. Pulling the new ones in did not then take long. The clean camshaft did not show significant wear, so it was offered up the next weekend, and it wouldn't go in! In fact, attempting to do so was met with a rather solid 'thunk' noise as it seemed to hit something. Close examination (not easy) showed that the new bush had deformed over some irregularities in the bore, so there was no option but to take out the new bush. Some joker had used a spot-welder to put some blobs of weld in the space (normally filled with a felt ring) adjacent to the operating lever. Cleaning that up with a half-round file seemed like a good idea until I discovered how hard the blobs were! In the end, it proved possible to draw a new bush in far enough to clear the O-ring groove, but not so far as to ride over the blobs. Then the camshaft was offered up again and it slid in sweetly and showed no play at all. Celebrations with a cup of coffee were in order. The other big issue in that area was the useless length of air-pipe that ran from the unloader to a point about level with the fluid-flywheel where it had been cut off and the length onward to the compressor removed. Don't ask me why! Quite a lot of the air-piping is rather corroded, and since that length would be difficult to repair it seems like a good idea to replace the whole run to the unloader with plastic. It's not complicated and it would be a good prototyping exercise. The clamps that held the pipe in the inside of the main, nearside chassis channel were easy to undo, if tedious, and it was soon lying on the ground outside the bus. Air is a crucial element to a Swift - without it there is no gearbox, for example - and due attention must be paid to this safety-critical system. The air-reservoirs must be properly cleaned and painted so that no rusty pinholes break through, and the securing straps are severely corroded. First stage for both jobs was undoing the straps and releasing the reservoirs from the pipework. The front one of the pair has only one union at each end - one for charging and the other for the feed to gearbox and doors. The rear, dual-reservoir handles the split-circuit brakes and has more unions than British Airways - so it made sense to start at the front. Talk about tight! Lying on my back under the low part of the chassis and using a foot to brace one spanner while hauling on the other with both hands finally shifted the inlet union, the other end was a breeze as it is small diameter and has a brass reducing adapter. One strap snapped under the torque of undoing its nut, the other started but seized and was cut off. Looks as if there is going to be no argument about new straps! The front reservoir is now lying with its pipework (carefully labelled) at the front of the bus ready for the painting season to commence. To finish off I mounted the driver's window pan, which has been repaired at home, and the cab side which made a huge cosmetic improvement. Sadly, not much more can be done in that area without a supply of new beading as the original lengths are damaged and incorrect specification in part. I also addressed the problem of sourcing new weatherstripping for the windscreen, cab window and ancillaries like the blind-box and the nest-boxes. COH Baines have kindly sent samples of two types for the windscreen and it was gratifying to see that both would do quite nicely, although I worry that the 6mm nominal thickness for the windscreen is a good millimetre less than reality. The rubber will fit, but it tends to gape a little. I hope that it will stretch a bit, since there is no real alternative, and fitting the filler will tend to close it up somewhat.
I have been looking for a long time to find a partner to take over some more serious operations, such as the welding required to the rusty front riser. When I was at last introduced to someone and I showed him the job an alternative plan arose - to remove the offside riser section completely and make a new one, which he would undertake. The plan had merit as there was more corrosion deep under the floor where the nearside section bolts obliquely onto the centre and offside riser sections, which run diagonally under the saloon floor before turning beneath the driver's cab bulkhead. Fortunately, it is a simple folded construction with bolts holding everything together - typical PRV, of course. It was with a mixture of horror and elation that I found the large hole in the chassis when I visited on the first weekend of February, but it was a good opportunity to set to and clean up the surroundings and apply some paint to areas that would be inaccessible when the new riser section is inserted. Since then it has been a matter of wire-brush, paint and more paint. My scaffolding is now festooned with strange, silver-coloured fruit as the various loose bits of chassis, the air tank and associated saddles dangle in the air to dry. I have also had a trip to visit David Thrower and Mike Lloyd in Warrington, combined with a drop-off of handrails for powder-coating and a purchase of beading for the bodywork (Service Metals, Oldham). Sadly, the handrails did not make good progress as sufficient plastic coating survives on the window bars to prevent shot-blasting and re-coating. The others were held up while production moved to a new factory unit (in fact the operation has been abandoned as I was concerned that they may get lost). The driver's cab window pan will also be ready for installation soon, as I have a supply of beading on hand and the last of the screw-holes are plugged. The old and new vertical beading were rivetted together temporarily as a jig so that I could use the drill-press at home and countersink the holes neatly. Although the front chassis member has not yet been straightened satisfactorily, the new entrance step threshold has been made very neatly and has been offered up. Until the front cross-member is sorted there will be little progress in that area, since the two are linked by a substantial outrigger which does not yet point in the correct direction. At last I have also started work on the grp windscreen pan. Although it was in one piece and in a generally good condition, some cracking had occurred and a couple of large chunks were missing. The simple, "worktop-saver" method was used to repair the wing-mirror area with good effect, and the following week a protracted effort was made on the legacy of paint and other damage. Paint-stripper was applied judiciously to the upper box section while minor repairs to a cracked section of the windscreen support lip were setting (held in place with a pair of bulldog clips). Once that was ready, attention moved to the lower nearside corner where some extensive damage must have been attended to a long time ago as it was beneath the Deeble, beige coloured paint. Here a large chunk of the curved corner was missing - requiring a whole "worktop saver" supported in several places to form the necessary curve at the front and side. New mat was laid up in a single, thin layer to act as a base for further work when the contours had been checked over. Incredibly, a whole day had passed by the time the cab window surround had been hung in place with a couple of screws through the new beading.
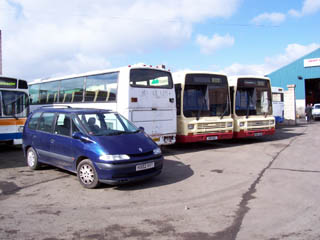
Reports that LCBS Swift SMA3 was in Ripley's scrapyard set me thinking that chassis parts should be interchangeable despite the obvious diffrences in body style. So I had an awayday in mid-March in the hope that some wheels and other parts would turn out to be useful. Sadly, it did not turn out as I had hoped. The wheels were a horrid hotch-potch, none of which were any use to me and the front chassis member turned out to be only slightly bent, but had been cut short by Alexanders to make way for their front entrance step, which mounts in a different way. I did not wish to make a journey for nothing, so I set to removing the radiator, header tank and associated pipework and the silencer, which sounded a lot stronger than mine. From inside I managed to retrieve two fluorescent lamp diffusers for Len Ricketts for his LHS. Despite the fact that these were simply hardware in common trade at the time, I could hardly believe that I found them on the very vehicle I had set out to visit! It is likely that SMA3 will be scrapped soon, so I have asked for the differential and steering gear to be kept for me. The scene in the scrapyard was so distressing that I could not take any photographs. Ripley shunts his derelict stock (several Leyland Titans in evidence nearby) with a hydraulic face-shovel, so it is not a pretty sight. For an encore on Sunday I was allowed down to SM106 as there was nowhere else to store my booty, so I made use of the quick trip to put more fibreglass onto the areas started on the last visit. For spanner duty I set about freeing off the union-nut on the air-pipe that leads into the front reservoir, which was rusted so tightly that rotating the whole pipe around the tank had been the only way of undoing it. Heat and penetrating oil won, so the kit of parts for re-assembly is growing nicely. I went on safari for the weekend of the Cobham/Longcross open day, visiting SM30 at Emsworth and then SM1 at Rainham on Saturday. It was particularly heartening to see SM1 up on high stands, with lots of work going on for a return to service later in the year. Meeting by chance with MB641 and Bryan Nash at Longcross was a pure bonus. It was very strange that all the vehicles were fully-seated, single-door saloons - very different from SM106, of course. It was also strange to see a Merlin with blue seats, which I do not recall from the country area. I also found some Swift wheel-rims in the midst of a formidable patch of brambles in Essex, and met a group of very hospitable vehicle-owners who use the rest of the site. Thanks for a very welcome cup of tea, guys. The day at Longcross was excellent, the site gave very good exposure to the continual circling of buses on car-park shuttles and off-site duties. In this respect it was hugely superior to Wisley, but Longcross was a much more complex site to use, especially for car parking. The greatest disappointment of the day was discovering that SMS369 had not been MOT'd in time to act as the control point as had been proposed. Perfect weather throughout the weekend was the real bonus of course.
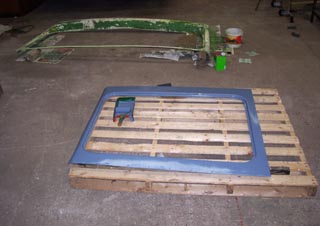
Over Easter there was no progress, so it was good to get back on site the next weekend. Preparation for re-instating the windscreen is the current priority, but news that the farm where we are based will soon be put up for sale may change that very quickly. Getting rid of the remaining yucky paint on the GRP pan and rubbing down prior to repainting was quite arduous, as the moulding is too large to work on except at floor level and I am becoming too old for all that bending down. For a change of posture, final rubbing down and priming of the cab window pan made a good diversion. The warm sun made sure that things dried well and it became the first day of the year when my pullover could be dispensed with. I was also able to inspect the winscreen moulding for cracks and broken screw-holes. After a good scrub to remove the green goo, I hung it in place - and what a picture that made! Even more like a bus than ever. What a shame that it must come off for finishing, and to paint the front dash interior while it is still accessible. The other job was a coat of silver on the back axle so that installing the brake parts will not be impeded when the time comes. A very unhappy reason for a meeting with my fellow-owners and the family from the farm was the funeral in late April of our farmer landlord. Although he and his wife had already decided to sell-up and move away, his untimely death brought matters to a new urgency. He was a nice chap from the old-school, a lifelong hill-farmer and will be greatly missed by us all.
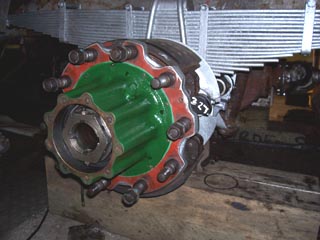
April and May continued to be a lean time for SM106, with events and family taking up weekend after weekend. Riding up to Manchester Transport Museum on Dave Thrower's RF508 for the London Bus Day was a treat and proved to be important for networking - and then all too soon it was Llandudno Transport Festival again. The high spot was also RF-related; this time I was honoured to be invited to drive Allan & Sue Edgar's RF271 in the Saturday road run to Conwy. I hope that Allan will agree with me when I say that I was beginning to feel more confident by the time we returned to the field. It is something of a shock to the system having to remember to select the NEXT gear immediately after engaging the last. What a fine machine! Crawling back under SM106 with a wire brush and cleaning off the offside chassis and brake-backplate was a suitable penance after all the fun - but it looks nice in primer now. I spent much of a morning fitting the cleaned-up offside hub and setting the taper-roller bearings. Either the end-float was right or the nut would do up, so in the end I cheated by removing a few thou' from the distance pieces with a hone-stone (in the absence of a kit of shims) and found a magic combination that brought the locking-nut just into alignment while the bearings were spot-on. The locking-nut rotates through a window of only a degree or two that will allow the square-headed bolts which pin the assembly to be inserted fully. It will be no surprise that the (single) bolt originally fitted was badly mangled where it had been forced into place in the past - so it was a pleasure to fit two better examples that fell into my toolbox while visiting SMA3 earlier in the year. Trouble was, having made it all ticketty-boo, it had to come off again for the new oil-seal to be fitted! More nerve-racking stuff, but a carefully-placed whack with a strategic piece of wood and a large hammer put everything to rights. By the way - the operation was performed almost exactly as specified in the maintenance book - as you would know if you had one. What is not stated is the weight of the hub, and I was exhausted after crouching in the wheel-arch lifting the hub on and off and levering on the box-spanner all morning. Much of another day was spent removing old paint from the gutter sections while rain hammered on the roof of the shed on the Spring Bank Holiday Sunday, then as the afternoon warmed up a bit I put etch-primer and grey undercoat on the front dash interior (must keep moving on towards windscreen re-fitting). |


|
BACK .......to the index. |
FORWARD .......to continue the diary. |