
|
BPH 106H SM106 Restoration 2006 |

|
|
January is not the warmest month, even in a comfy barn, and the tap has been frozen so water for brewing-up has to be brought in a can. Just right for some exercise in fact, so woodwork is the chosen activity at the moment.... A digression.....Take a look at the next Plaxton-bodied Dennis Dart that passes. Its profound ugliness arises in part from the way that it is a perfectly rectangular box. To avoid this effect, the designer of the Park Royal body on SM106 has made the lower bodyside curved, has sloped the windows inwards slightly, made a eliptical roofline and introduced a slight taper to the framing ahead of the front axle. Just what is needed to reduce the natural tendency to hit things when cornering. Curiously then, the taper of the offside cab area has been negated by supporting the panelling on wooden rails which taper in the opposite sense, which makes the body almost straight until it starts to curve quite sharply towards the corner. The wooden rails then sit flat on the stress-panels and need a relief where the panel is rivetted to the frames. Quite a fiddly bit of joinery for an amateur like me - especially as I sought to overcome a serious design problem with the rails themselves: they were in the wrong place. Never one to make work when it is not needed, I would have plugged the old screw-holes and made do. Unlike the lower rail, the upper one was intact - but the line of the beading was so close to the top edge of the rail that the screws had split the wood or missed it altogether. Both rails which were of inch-and-a-bit ash have been replaced by two-inch meranti, which gives me well over half an inch extra for the screws to bite into.
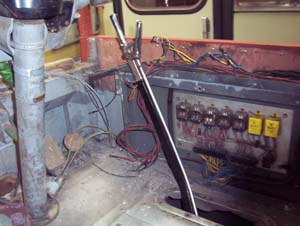
Before re-panelling the cabside and re-fitting the fibreglass pans for cab side window and windscreen is possible, a good deal of preparation must be done prior to repainting cab and saloon interior. All this work would be done easier off the bus and before the windscreen is fitted, so it has all been stripped out. The windscreen is fitted in a rubber beading which fits over a composite moulding formed from a fibreglass outer and the pressed sheet-aluminium inner. Because the aluminium inner could not be manufactured from a single piece, it is actually in a good half-dozen - all of which rivet into the rectangular aperture at the front of the saloon. Four more pieces make the interior of the cab window, together with the window ledge which carries the door switches. In the photo above you can see the spaghetti of wiring for the doors and interior functions - including the switch turret for the fare-stages illumination on the AFC machine. "But these buses didn't have AFC machines", I hear you say. No, but they did have the wiring! Look also at the mass of relays for interlocking and controlling the door operation. It all clicked reassuringly when power was applied (before the switches were removed) so I am hopeful that there is sufficient life there still. A similar panel was removed from SMS637 as part of the spares kit back in 2004. The window ledge has suffered under the impact of 25 years of drivers' elbows, and some of the nutserts holding the door controls parted from the panel rather than their screws - but that's life. A bit of TLC will be applied before reassembly. In the meantime, a production line is in operation at home removing all the paint and rubbing down to the metal. The present top-coat of gruesome and poorly-applied mid-grey paint cannot be removed without damaging the original finish, so it is all coming off. You can see the two shades in the picture. A very unfortunate discovery was that the paint applied by MCW on the replacement nearside-upper interior pan was unaffected by paint stripper, whereas Park Royal paint comes off in one pass, pink primer and all. Original panels are all identified with the number 56 on the back, so it seems that the whole of the first batch of red and green Swifts was kitted by the stores in one series. The back of the panels will be left as they are for authenticity.
After a couple of weeks of intermittent evening activity stripping and rubbing down the panels, I was finally ready for the great painting session. Some metal-bashing was necessary to straighten the elbow-damage and to drill the screws out of their nutserts (surprisingly easy in the end). The problem with working in my garage was that it was so cold that I had to put a heater on to keep the paint runny. Using a roller is wasteful unless a batch of work is set up. The first coat of etching primer took long enough that the polystyrene core of the roller started softening with the solvent, and eventually the foam cracked and started to drop occasional bits in the paint. Fortunately only the last panel was really affected and that was dealt with quickly once dried. The grey undercoat was much nicer to work with - and looked really smart until it started to dry. A couple more evenings and the whole inner pan will be ready for re-assembly in situ. The roller problem will have to be sorted before I start a big job like the roof! Cold weather gave way recently to warmer, rainier conditions, leaving the bus drenched in condensation, and making progress with paint was impossible. The newly-painted parts were taken on site, but cannot be attached. Further work was done on the front dash panel, and the box over the de-mister heat exchanger was opened. Fag packets, tab ends and rubbish were immediately apparent - as was a rag stuffed into two of the air outlets! At last the metalwork of the nearside corner is fully exposed for preparation and woodwork repairs, which will lead inevitably to removing the front step assembly. It was also discovered that the underneath of the destination blind box was originally finished in Magnolia, but was overpainted in grey to match the windscreen surround, and finally in the grey gunk applied in Blue Lake days. Some attention will be required there to rust spots coming through. A local source of foam rubber has been found and some offcuts procured, so it has been possible to rivet the emergency door interior back together with its foam insert. The rather sad-looking Checkmate panel has cleaned up nicely with some very fine grade Scotch-Brite - it's fantastic stuff for preparing aluminium.
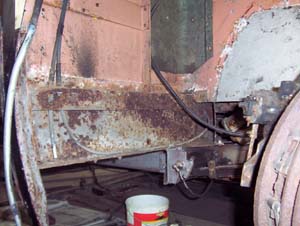
With the nearside front corner laid bare, the difficult issue of the modified front step has become a priority. Until it is tackled, no reassembly will be possible. A very strenuous day was therefore spent removing the whole shooting match - starting with the doors, which were easy as each pair is held on the hinge-poles with just four bolts. The poles are captive between the actuators at the top and a lower bearing that comes through the edge of the step. Luckily the lower bolts were so corroded that they simply sheared off. The improvised step had been built in-situ, so drilling out rivets and levering up the nosing and wooden step treads was the only way in. After a lot of work cutting bolts with my angle-grinder, the whole assembly was dangling from just three more bolts, only one of which could I reach! Two had countersunk heads behind treadplate that formed the new sides of the step-well, and they succumbed to the laborious process of drilling their heads off after the treadplate was bent back (not easy). The last one was accessible, but when it was cut through it was found that the parts had also been welded, so the steel angle was simply cut off with the trusty angle-grinder. The 'zero-step' entrance had finally arrived, guaranteeing that SM106 is now a disabled-free zone - and what a huge hole it has made! Immediately problems were apparent - such as corrosion to the riser (just like an RT!) and certain chassis modifications that were made with a gas-axe. Sweeping up the debris and putting a bit of paint on the windscreen frame was all that I could manage after that.
Many years ago Ian Barrett chopped the front entrance step out of a country Swift to use as a spare or pattern for SM106. I think it was SM533, and there are significant differences because the MCW version is rivetted throughout, whereas Park Royal bolted theirs. That is lucky, as it is much easier to take to pieces, even if you do use an angle-grinder. Close examination showed that Blue Lake had recycled a number of key parts of the old step assembly, and it appears to be possible to put it back as it should be without too much pain. Once you know where the bits go, putting them back is not too difficult, but removing the modifications was very slow work, especially working in the narrow gap between the chassis and the floor. The key to progress is now the removal of the wheel-arch inner so that the back of the riser can be approached and reinforced. At that point, new angle can be bolted in to remake the saloon floor profile and we will be nearly there. Demolition of the old step and cleaning and priming the chassis where it will be inaccessible in future finished a useful session.
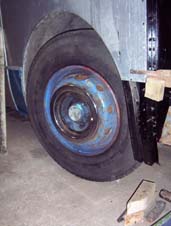
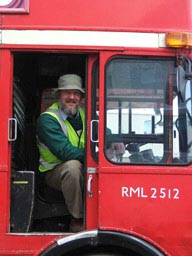
Only 12 weeks since they were fitted, two of the second-hand tyres have finally been inflated and one wheel has been fitted to the bus! I am indebted to the enthusiastic staff of a local crane hire company, who just happen to run a couple of AEC Matadors for technical jobs. In the end a combination of equipment and experience got the job done in no time at all. It looks just as it should, and is a huge improvement on the temporary wheels ex Halifax Regent, even though the colour is wrong. It is also enhanced by a bona-fide nut cover ring which is one of a few donated by Lawrence Hollingworth, an AEC enthusiast from Clun in Shropshire. Maurice has found me a suitable tap, so all the threaded holes in the hubs have been cleaned out - including the one with the snapped-off stud. She's beginning to look like a proper bus at last.
Only someone as hopelessly optimistic as I am would consider removing the nearside fibreglass inner wheel arch, although it should be remembered that there is a real purpose to this exercise. After spending a couple of hours drilling out rivets and bolt-heads and fashioning an angled tool to lift the edge of the grp moulding, you can imagine my disappointment when the assembly refused to budge. Never mind, close proximity to the front axle gave plenty of opportunity for general cleaning-up as an alternative, and I was able to collect a couple of pounds of oily soil from the top of the road-spring and around the king-pin and brake air-chamber. I also tried Maurice's newly-made blind tension-roller for size, and it did very well indeed. Yes, I know the 98 was a 'red' route, but the blind is a genuine Chiswick K for an SMS at Uxbridge, only cost a tenner on eBay (almost unbelievable, I know) and it is fine for testing the winder assembly - and you must admit that it looks the part. A coat of aluminium paint on the front chassis finished another busy day.
A second attempt at the wheel arch was succesful during the next session. It was only being held in place by the stumps of the rivets - which are round-headed aluminium and visible inside at the base of the luggage pen. A (careful) combined assault from inside the wheel arch and from inside the saloon eventually persuaded all the rivets out and then the grp moulding slid gracefully down and out to freedom. A small avalanche of detritus followed, comprising 30 years of grot from the bottom of the luggage pen. Its most notable ingredients included gum wrappers, an empty fountain-pen ink cartridge, the outer tube from a ladies' lipstick and one unused (very useful) aluminium rivet. Apart from the riser itself, the general condition was excellent considering the age of the vehicle. Lots of cleaning and patching to go at, mind! Also revealed was the wiring for the AFC machine disappearing mysteriously into the base of the luggage pen. A similar assault on the front dash in preparation for step re-instatement yielded a couple of crumpled but legible betting slips which were obviously concealed in haste behind the demister unit. The remains of the bolt holding the step frame was removed from its fixing hole, which is good as it indicates no great difficulty in putting a bolt into the new one in due course. The rest of the day was spent fitting the worktop into the luggage pen so that I can brew-up more securely, tidying up and putting the top coat of silver on the chassis from the step-well. It now looks good enough to eat off. The luggage-pen worktop assembly is recycled from three places: bedroom furniture, our late boat and some redundant steel angle from Blue Lake's old step. Very satisfying indeed! I have finally sourced a box spanner for use on the rear hub-retaining nuts - but when the locking bolts were removed it proved possible to remove both nuts by hand. Talk about an anticlimax! Removal revealed the true horror of the mess of oil and grease caking the back of the offside hub, so now it is a matter of cleaning it up and finding new seals - while attention is given to the brake camshafts. The metalwork for the new front step frame has been sourced and measured, so now I need a welder to join the two pieces which will carry the reinstated floor. I also took to pieces the spare step assembly to recover the folded checkmate aluminium panels which will be attached or used as patterns. Then it was time to get busy on the chassis cleanup, so the offside between the axles which is normally hidden behind the monster fuel tank was brushed off and primed. It's good to smell paint at the end of the day.
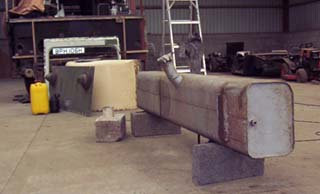
No spectacular progess was made in early May, due in part to the annual intervention of the Llandudno Transport Festival. All the neighbouring vehicles from the farm attended, leaving SM106 very forlorn and lonely. However there were compensations, as can be seen in the photo. It's very hard when you can't drive your own bus, so alternatives must be sought. Thanks to Dave and Kelvin, and Robin for the photo. Despite the great weekend away, jobs have been done - such as sourcing new hub-seals and fuel-filter, putting more paint on the chassis and under the destination blind box and preparation work for painting the roof. Getting to grips with the fuel tank was interesting - especially relieving it of the dregs at the bottom. A seven-foot tank holds a lot of dregs, but the real surprise was that stuff that came out was RED. Forgive me for being sceptical that the red colour develops with old age......... Fortunately there was no significant 'foreign' content or water. The empty tank was much easier to handle, so it was wire-brushed all over, then stood on end and painted in primer. That way the ends can be painted after installation where they are still accessible. The other job was removal of the n/s rear brake camshaft - which was expected to yield a nightmare vision and did not disappoint. The journals on the shaft were severely worn (the shaft could be waggled about easily) but the state of the bushes was difficult to determine. No evidence of needle-roller bearings, mind!
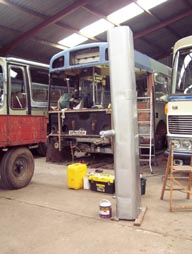
When I was talking to Keith Wright about the brake camshaft problem he said that he thought he had one in his garage, and so he did - but it was a right-hand one, not left, which was a shame. Thanks, Keith. Another line that drew a blank was my friends at AufoFast, who did not recognise the camshaft part number and were unable to source the bush to match. It looks as if some basic engineering might be called for. Unable to make progress with mechanical stuff, I decided to do something else, and set about some painting. I have chosen to use 'Pre-Kote' by International, which is specified as a primer on GRP, and it went on really nicely. It was good to cover the piebald front dome with one colour after all the weeks of scraping, filling and sanding. I also prepared the first bay of the roof, which is aluminium. Some damp Scotch-brite clamped in my orbital sander made a lovely surface and it was quickly covered with a very fragrant etch-primer. That was soon dry, of course, so a coat of green undercoat followed - which was not easy to apply as I found before. Two coats of aluminium on the fuel tank bracketed some of that activity, so it felt as if progress was being made. You can see the multi-coloured roof in the latest fuel-tank picture. A well-earned cup of tea was taken before crawling underneath to measure the brake camshaft carriers and bushes, and that was enough for the day. |
||||||||||||||||||


|
BACK .......to the index. |
FORWARD .......to continue the diary. |